Monday, December 20, 2010

Snowman Tree Part 4

For these rustic snow creatures, I used a mix of mod podge and paint. I painted the snow white, the noses orange, and I used paper for the signs. And I antiqued the edges-always!I thought these turned out darling. They are my favorite ornament so far and they were one of my least favorites unfinished! These ceramic ornaments ended up being very easy and quick to finish. The surface wasn't really right for mod podge, so I thought I was stuck with painting. However, inspiration hit when I glanced over at my scrapbooking supplies and noticed my markers! Instead of painting, I colored!
I quickly colored the hats and faces. Then I glued on scarves and buttons. Simple and sweet.
Yesterday morning, I was able to hang the last of the snowmen onto the tree. I am very pleased with the result. The tree is fun, colorful and full of personality. Its themed and decorated, which I want, but because its full of wacky snowmen, it has become casual and quirky instead of stuffy and formal. I don't really have a formal house (kinda hard with 3 little boys ages 5 and under) so a formal tree just didn't look right. This fits my family's personality and style.

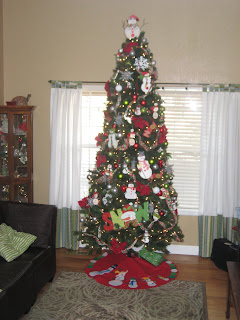
Now, its on to other projects. I have a list a mile long of Christmas crafts I thought would be fun this year. I wonder how many I can squeeze into the remaining naptimes I have left...

Sunday, December 19, 2010

Snowman Tree Part 3


These cute snowmen I purchased at Target in the after Christmas sales. I thought they were darling, just a little dull for my color scheme. So, I ripped off the fabric scarfs and added my own fabric swatches. Then I glued on a fun button at the scarf knot. Love the bright new look.


These were plain white styrofoam forms. I just added fabric and buttons with hot glue. I drew the faces on with a marker. These are about 10in tall, so they make a huge statement on the tree, even though I only have 5 of them.


These Noel signs I added to the tree even though they don't fit in with the theme. I just thought they were cute. First I spray painted them red-so much faster than hand painting. Then, I decoupaged scrapbooking paper. Very fast and easy! Finally, I antiqued the edges.


You can't really see what I did to these plain wooden snowflakes from these pictures. I sprayed them white then I added white glitter. Simple and sparkly!


Saturday, December 18, 2010

Snowman Tree Part 2

I had several of these wooden snowmen that simply needed a little paint. I brought it out the paint and brushes and brushed up on my toll painting skills. These snowmen were just a tad tedious, requiring several coats of paint. I think I love decoupaging-its so much faster! But, I have to say that I think these snowmen do look rather adorable.


Friday, December 17, 2010

Snowman Tree Part 1


I love snowmen right now. A few years ago, I started collecting them. I have them scattered throughout the main floor. I also have room for 3 Christmas trees in my house: one in the living room, one for the family room and one in the kitchen. As you know, the kitchen tree is a gingerbread tree. The family room tree is hodge podge of ornaments that have been collected through the years as Mr. Right was growing up, ornaments I came to the marriage with and then ornaments that we have collected together. The tree in the living room is our formal, decorated tree. Last year I had matching balls and ribbons and red poinsettias. I decided that I wanted to add snowmen to the mix. Just a few days before Christmas, I added a Snowman Family tree skirt. And during the after Christmas sales, my mom and I scoured the shops for snowmen ornaments or items I could use to develop the theme. My plan was to work on these things all year so that when it was time to decorate for Christmas this year, I would have all of these cute snowmen ready to hang up. Well,
that was a fantastic plan that completely fell through. I was simply too busy juggling motherhood with 3 kids and new jobs for Mr. Right and I that I didn't even open up the boxes until after Thanksgiving. Lately I have been working feverishly on these snowmen crafts during my crafting time!
For these papermache snowmen, I modpodged white paper with sparkles on it for the snow, then striped papers for the the scarf and hat. I antiqued all of the edges, and then I painted on the eyes and glued on buttons, branches and balls for the embellishments. I used orange thumbtacks for the noses. One of the snowmen is now placed at the top of my tree in place of the traditional star. The other is displayed on a table in the entryway.


Thursday, December 9, 2010

Gingerbread Kitchen

Remember when you and your young hubby were crammed in a tiny one bedroom basement apartment and even 1 box filled with holiday decorations just seemed to overpower the tiny space? I do. Gradually through the years, we have moved to slightly larger apartments, to a small house and now we are in a medium sized house. As the size of our home has grown, so has the size and quantity of my holiday decoration boxes :) We had only been in our house a few months last Christmas, so I didn't have enough decorations to fill all of the spaces last year. I added a few and brainstormed for ideas of what I could do to all of the remaining spaces. I have several nativities and a snowman theme throughout most of our main living areas. However, I thought it could be really fun to have a different theme in the kitchen. I had seen a gingerbread theme in someone else's kitchen (my mom's) and I decided to copy it for this year. When I mentioned my idea to Mom, she decided to give me most of her gingerbread stuff. She has since moved on to a different theme and her stuff was just collecting dust in a box in the attic. I graciously accepted! Some of the figures I place on my countertop and some I placed in the space above the cupboards. As you can see, I need to add a little bit more. I have some gingerbread craft ideas that I hope to make over the next couple weeks to add to the collection. Most likely, it will take me 2 or 3 Christmas seasons to finish collecting gingerbread decorations for the kitchen. It should be fun!
I have a small, slender tree that I can put in a corner of my kitchen. My mom has one too, and she also gave me her gingerbread ornaments. Many I could simply hang on the tree. She did give me some cookie cutter ornaments that I modified. She uses the traditional reds and greens in her holiday decorations. However, I have decorated my house in the really bright red and lime greens that are popular right now. So I added brightly colored ribbon and bright red and green picks to the cookie cutters so that they tie in better with my color scheme.
My mom also had these really cute tiny gingerbread men ornaments meant for a miniature tree that she had glued to ribbons and used on her slim tree. However, my tree is smaller than my mom's and with all the other gingerbread ornaments and cookie cutters it was already too full. So, I glued ribbons that matched the cookie cutter ornaments to the mini ornaments making a loop. Then I strung these up on the curtain rods in the kitchen windows for a little window decoration.
Kind of a fun effect and it helps spread the gingerbread theme throughout the kitchen.

I just think this little tree is darling, and it is so fun to have so many Christmas decorations in my kitchen. I spend enough time there cooking and doing dishes that it is really nice to have it decorated along with the rest of the house!

Refinshed Kitchen Table

My little family of four became a little family of 5 one year ago. We had a small bistro sized table in our kitchen that we could barely squeeze all four of us into. Most of the time, the kids and I would eat in the kitchen for breakfast and lunch. Then, when my hubby came home, we would use the dining room table for dinner. But, I was sick of the mess created by eating in the dining room everyday, so I wanted a bigger kitchen table. I knew I had about a year until the baby would be eating with us at every meal to find something bigger for the kitchen. A new table and chairs set wasn't really in the budget, so I started scouring local garage sales and craigslist. I wanted a farmhouse style oval pedestal table. In August, I found this gem for a steal! The table and all 4 chairs for just $50. It was so cheap because the owner had tried to refinish it by painting it black but had botched the paint job. That may have been a deterrent for other potential buyers, but not for me. I scooped it up and planned on refinishing it right away. But life happened, and I didn't get started on it until November. I spent almost every naptime and several nights working on it. Hence the lack of projects posted in November! I was only working on this! I had to get it done by Thanksgiving when I had family coming into town. First I sanded and stripped off the black paint and the varnish and stain underneath the paint.
This step took forever. Turn out, chemical stripper really doesn't work when it is freezing outside!
Originally, I planned on being really creative with my finishes. I was going to use a blue or green tinted stain. I think it would have looked nice, but I decided to go with something more neutral in case I ever decide to change my color scheme. It simply took way too long to remove the old stain and I don't want to have to refinish this table again any time soon. I ended up painting the pedestal and legs in the same white as the trim on my walls. Then, I used a natural stain on the table top before applying multiple coats of polyurethane. I love the result. Classic and fresh looking. I was also able to find a bench online that has a similar natural stain on top and white base. Perfect. Now I have a table that will grow with the family!


Placemat Scripture Tote

One of the other wards in my church building was making these scripture totes for Super Saturday this fall. I thought they looked cute and fun, so after googling them, I found a tutorial I liked and sewed one for my sister's birthday. They are made from placemats and ribbon. All of the pictures I found online used plain placemats and dressed them up with pretty ribbons and flower embellishments. However, I know K's fav colors are red, yellow and brown and I couldn't pass up this darling stripped placemat. I sewed on plain yellow ribbon to counter the stripes on the tote. Then, I couldn't find any yellow silk flowers that I liked, so I made these awesome fabric rosettes. They look complicated, but they only took about 3 minutes each! I love the way the tote turned out and K loves the gift! This tote is large enough for her scriptures, Relief Society manual and her hymn book. Perfect!

Give Thanks Banner

This was a super cute, fast banner to make. After my Trick O Treat banner fiasco, I wanted to make a cute banner for Thanksgiving that didn't take multiple nap times to make. I created this in one evening! First, I traced my letters onto Heat N Bond, then ironned them onto brown felt and cut out. Second, I cut out squares of natural and orange burlap that I sewed together. I ironned one letter onto each burlap square. Then, I attached felt stickers that I found at my local craft store. Next, with an exacto knife, I cut two slits into the top each square so that I could run a length of brown grosgrain ribbon through the banner. Finally, I hung on my mantle to enjoy!

Thanksgiving Tablescape

I hosted Thanksgiving this year, and I wanted my table to look nice. I had plain white china for the placesettings, but I didn't have any fall table linens. I made napkin rings from some left over wired ribbon that I tied in a knot and glued together with hot glue. Then I sewed this awesome table runner out of orange burlap and corn husks. I found the idea and tutorial here and I just had to make one for myself. I made it for my table when it is completely extended. I enjoyed it so much, that I think I am going to make a second one that is shorter for my everyday table length next year.

 I just love how pretty the table looks!

LinkWithin

Related Posts Plugin for WordPress, Blogger...