Showing posts with label Snowman. Show all posts

Monday, December 20, 2010

Snowman Tree Part 4

For these rustic snow creatures, I used a mix of mod podge and paint. I painted the snow white, the noses orange, and I used paper for the signs. And I antiqued the edges-always!I thought these turned out darling. They are my favorite ornament so far and they were one of my least favorites unfinished! These ceramic ornaments ended up being very easy and quick to finish. The surface wasn't really right for mod podge, so I thought I was stuck with painting. However, inspiration hit when I glanced over at my scrapbooking supplies and noticed my markers! Instead of painting, I colored!
I quickly colored the hats and faces. Then I glued on scarves and buttons. Simple and sweet.
Yesterday morning, I was able to hang the last of the snowmen onto the tree. I am very pleased with the result. The tree is fun, colorful and full of personality. Its themed and decorated, which I want, but because its full of wacky snowmen, it has become casual and quirky instead of stuffy and formal. I don't really have a formal house (kinda hard with 3 little boys ages 5 and under) so a formal tree just didn't look right. This fits my family's personality and style.

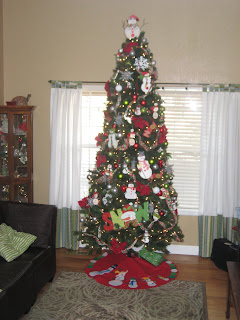
Now, its on to other projects. I have a list a mile long of Christmas crafts I thought would be fun this year. I wonder how many I can squeeze into the remaining naptimes I have left...

Sunday, December 19, 2010

Snowman Tree Part 3


These cute snowmen I purchased at Target in the after Christmas sales. I thought they were darling, just a little dull for my color scheme. So, I ripped off the fabric scarfs and added my own fabric swatches. Then I glued on a fun button at the scarf knot. Love the bright new look.


These were plain white styrofoam forms. I just added fabric and buttons with hot glue. I drew the faces on with a marker. These are about 10in tall, so they make a huge statement on the tree, even though I only have 5 of them.


These Noel signs I added to the tree even though they don't fit in with the theme. I just thought they were cute. First I spray painted them red-so much faster than hand painting. Then, I decoupaged scrapbooking paper. Very fast and easy! Finally, I antiqued the edges.


You can't really see what I did to these plain wooden snowflakes from these pictures. I sprayed them white then I added white glitter. Simple and sparkly!


Saturday, December 18, 2010

Snowman Tree Part 2

I had several of these wooden snowmen that simply needed a little paint. I brought it out the paint and brushes and brushed up on my toll painting skills. These snowmen were just a tad tedious, requiring several coats of paint. I think I love decoupaging-its so much faster! But, I have to say that I think these snowmen do look rather adorable.


Friday, December 17, 2010

Snowman Tree Part 1


I love snowmen right now. A few years ago, I started collecting them. I have them scattered throughout the main floor. I also have room for 3 Christmas trees in my house: one in the living room, one for the family room and one in the kitchen. As you know, the kitchen tree is a gingerbread tree. The family room tree is hodge podge of ornaments that have been collected through the years as Mr. Right was growing up, ornaments I came to the marriage with and then ornaments that we have collected together. The tree in the living room is our formal, decorated tree. Last year I had matching balls and ribbons and red poinsettias. I decided that I wanted to add snowmen to the mix. Just a few days before Christmas, I added a Snowman Family tree skirt. And during the after Christmas sales, my mom and I scoured the shops for snowmen ornaments or items I could use to develop the theme. My plan was to work on these things all year so that when it was time to decorate for Christmas this year, I would have all of these cute snowmen ready to hang up. Well,
that was a fantastic plan that completely fell through. I was simply too busy juggling motherhood with 3 kids and new jobs for Mr. Right and I that I didn't even open up the boxes until after Thanksgiving. Lately I have been working feverishly on these snowmen crafts during my crafting time!
For these papermache snowmen, I modpodged white paper with sparkles on it for the snow, then striped papers for the the scarf and hat. I antiqued all of the edges, and then I painted on the eyes and glued on buttons, branches and balls for the embellishments. I used orange thumbtacks for the noses. One of the snowmen is now placed at the top of my tree in place of the traditional star. The other is displayed on a table in the entryway.


Tuesday, February 23, 2010

Tree Skirt


I made this skirt in December with my mom when she came to stay after my son was born. We personalized each snowman to represent each person in my family.

Monthly Quilts

Project: Monthly Wall Quilts

Inspiration: On a trip to Houston to visit my parents Oct 2007, I noticed a pattern for a Christmas Nativity Wall quilt that I thought was absolutely beautiful. I tend to craft a lot with my mom, so we each decided to make one of these quilts. I had a great time sewing it and finished it with just a few days before Christmas that year. The next Christmas (2008) I actually got to enjoy it the entire season. We were living in a duplex at the time with a wall above my kitchen sink instead of a window. I hung the quilt there and it really brightened my days to be able to look at something so pretty instead of a blank wall while doing dishes. When January rolled around I was so sad to take down the quilt and be faced with a boring wall again. Wouldn't it be nice if I had something to hang all the time? Or even something seasonal for every month? And thus the monthly wall quilt was born. I created a quilt for almost every month, with only the months May and June sharing a quilt. My plan was to create each month's quilt during 2009 for that month. I almost made it. I had all quilts finished by the end of 2009 except for the May quilt. I just finished the May quilt today!

How-to: 1. I took wooden tole painting patterns, clip art pics, original drawings, etc. and modified them in size and complexity to make them suitable for fabric appliques. On paper, I created the designs and quilt blocks to portray the various months.

2. I then took the drawings and traced the mirrow image pieces onto fusible web. Then, I ironed the pics onto the various fabrics and cut them out. Then, peel the paper off and iron the applique onto the background fabric.

3. Use embroidery floss and blanket stitch around each applique to finish.

4. Then, sew the blocks and strips together to form the top of the quilt.

5. Make tabs and sew on. Then sew on back and batting like a pillowcase. Turn rightside out, press and hand sew the hole closed.

6. Quilt the top.

7. Hang and enjoy.

Finished Product:

JanuaryFebruary MarchApril
May and June
Or June and August
July
September
October
November
December

LinkWithin

Related Posts Plugin for WordPress, Blogger...