

Wednesday, October 17, 2012
Wednesday, January 25, 2012
Bedding and Painting My Ceiling!
I feel like I've been really productive lately as well as keeping up with all of my responsibilities as a wife and mother. I've been working on redecorating my master bedroom, but I haven't let all the housework slide either. I'm feeling rather pleased. I've been anxious to get started on my room for some time. I finally decided that I was never just going to have a couple days with nothing better to do; if I wanted to redo my room, I was going to have to carve out time. So, I've been working on painting and projects during afternoon naptimes. I still have a lot to do, and can't really reveal too much, but here is a peak at the duvet I've been sewing for the bed.
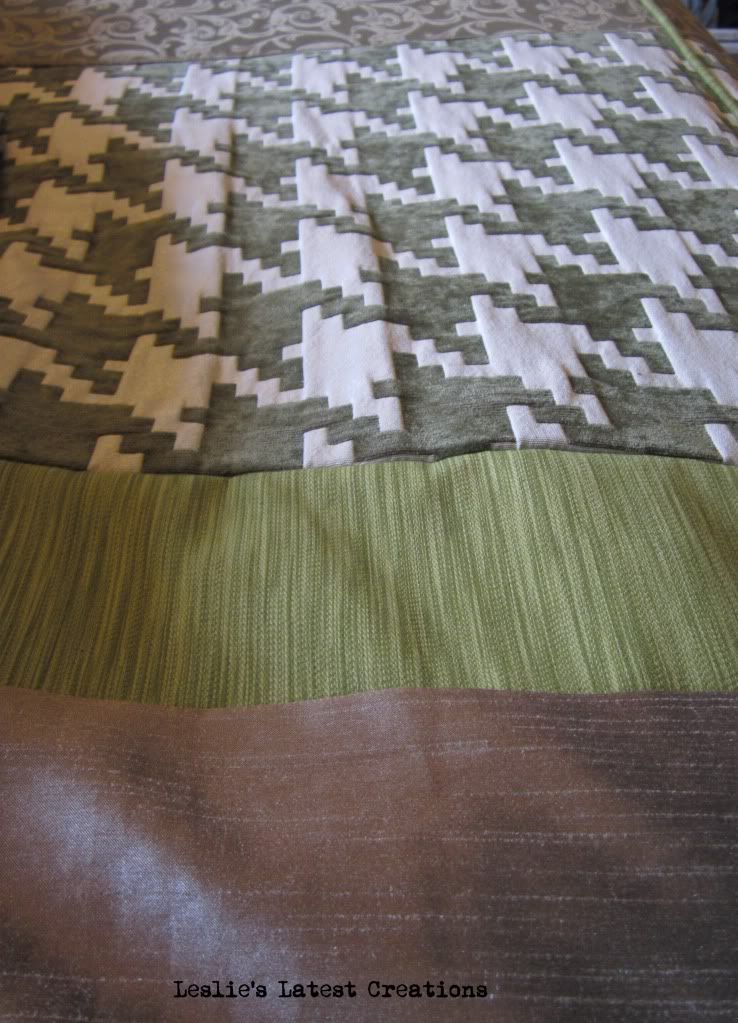
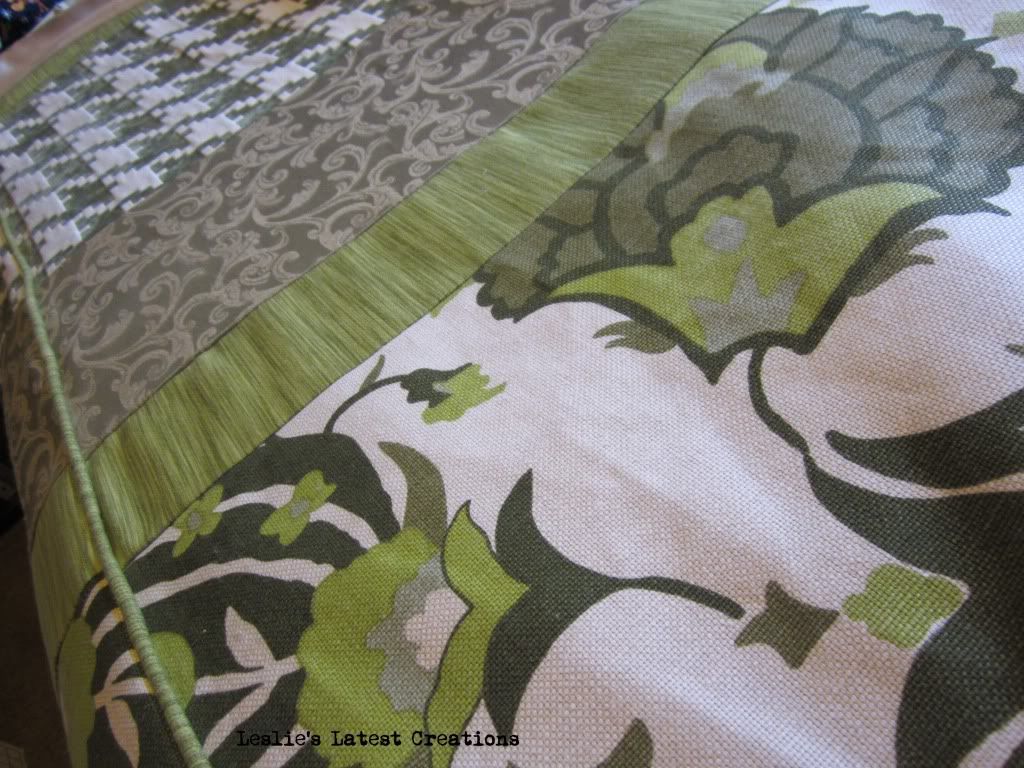
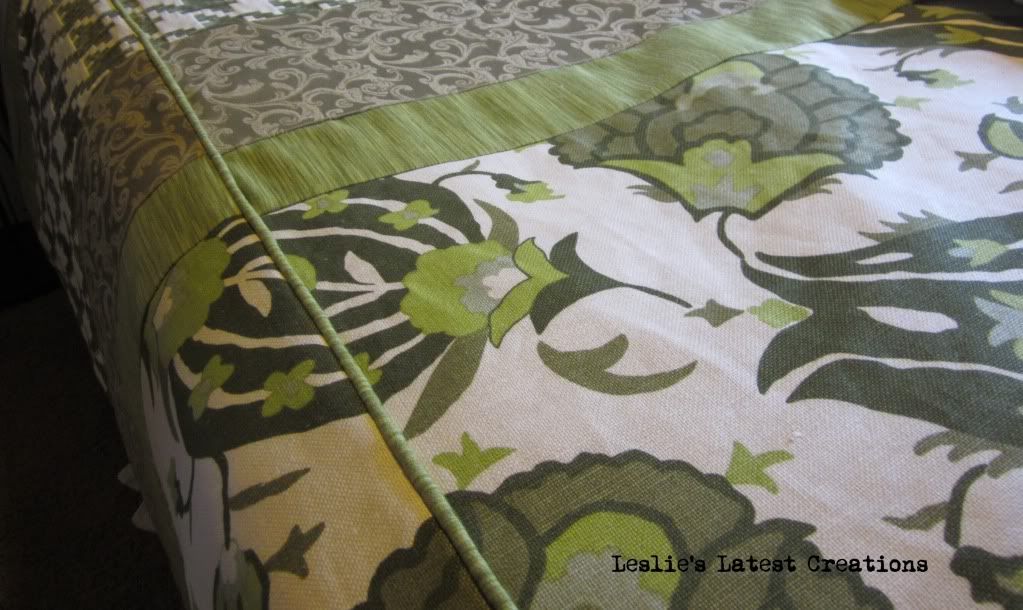
I just love the mix of colors, patterns and textures.
I've been working on painting the room for the past week. I still have a ways to go, but I love the changes so far. (I know most people can probably get a room painted in a couple days tops, but it's taking me a bit longer since I'm really only able to work on it for a couple hours a day, and I didn't get to it at all during the weekend. I'm just too busy with my family during my hours off work.)
The first thing to go with the current paint job was the ceiling paint. The entire house was sprayed this caramel beige color before we moved in, including the ceilings.
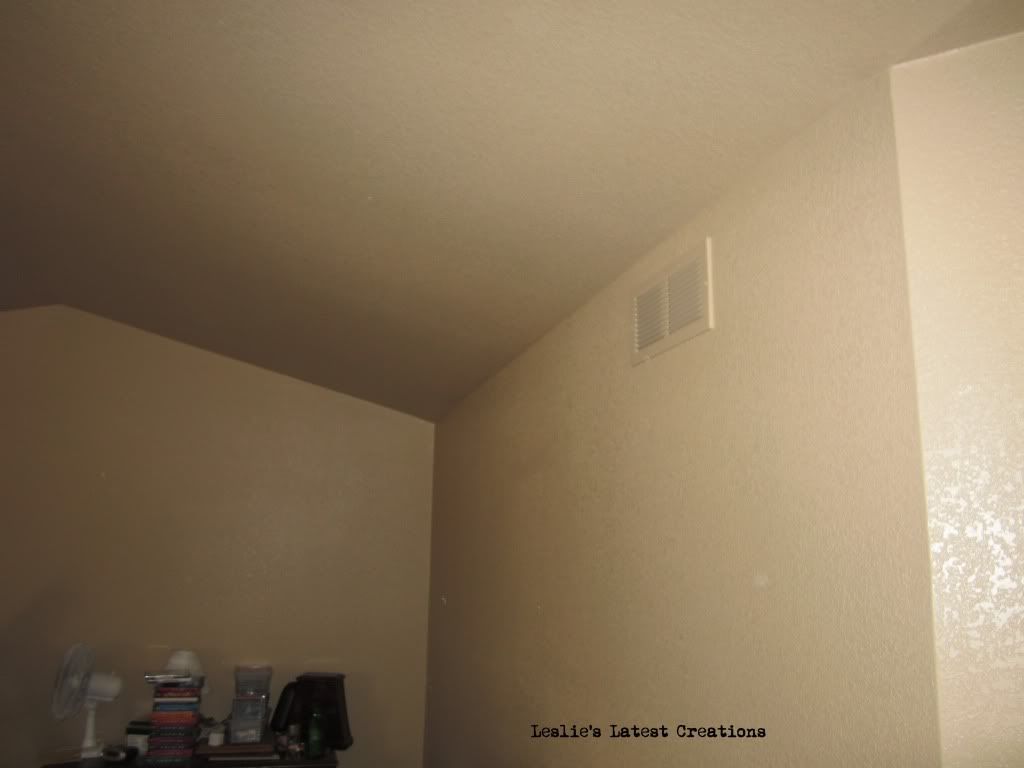
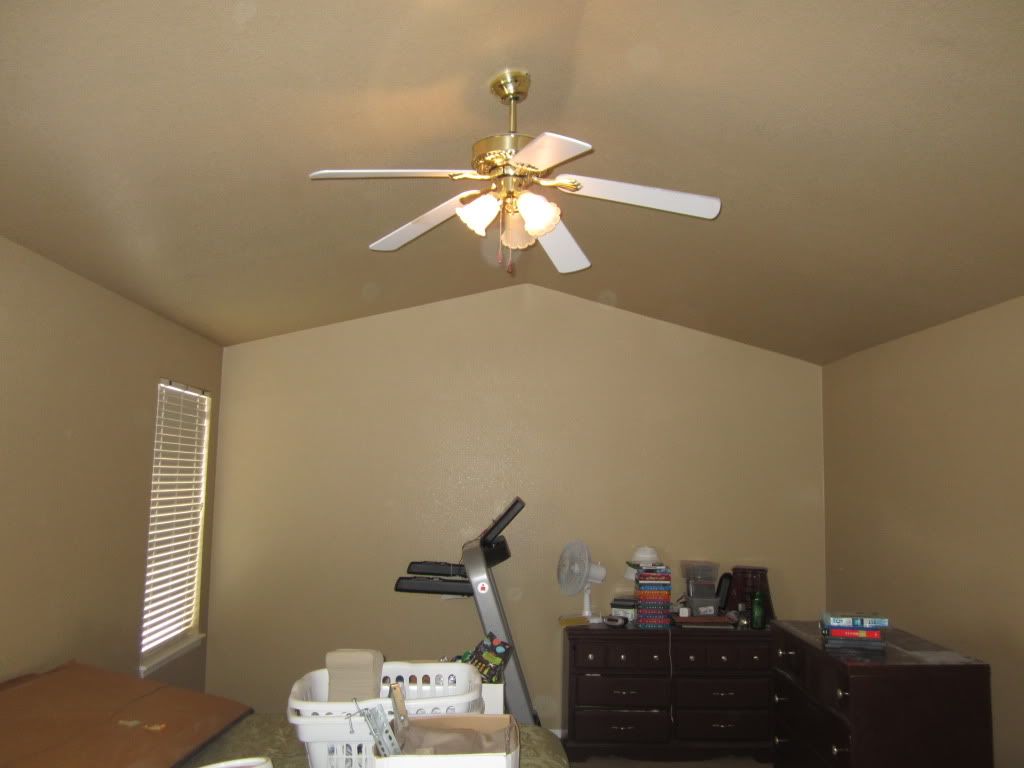
I'm not opposed to color on ceilings, but really this is just too dark and dreary, especially in a bedroom.
So, I repainted the ceiling a standard white. I love having the ceiling white. It makes the room feel so much larger and airy. It's so much brighter!
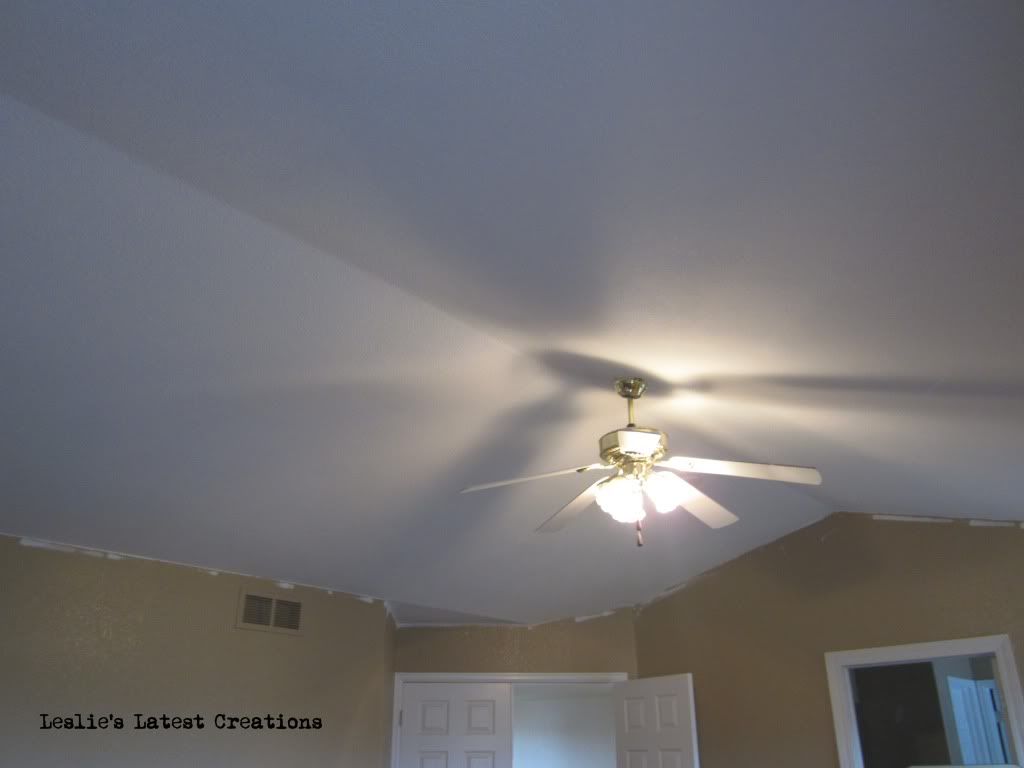
I'm currently working on the walls. I think they will be finished tomorrow, so expect some pictures in the next couple of days. I really can't wait to reveal them! I love the way paint is transforming this room.
Friday, January 20, 2012
Finish It Friday: Clay Pot Nativity
 \
\I finally finished this nativity the week before Christmas. Its a project that has been waiting for me to complete for over a year. I purchased the supplies in the fall of 2010 for my Relief Society's Fabulous Friday. This was the sample below. I didn't make it, but the owner didn't want to teach a class. So, I was in charge. I ended up buying a bunch of clay pots and the wooden ball for the heads when they were on sale. Fewer women signed-up than I expected, so I was stuck with a bunch of pots and balls. And, since I was in charge, I was too busy to work on my own version.

The supplies have been sitting in a box in my craft room closet since that night in the fall of 2010. This Christmas I decided I would make my own. And, I did! I finished it 4 days before Christmas, just in time. These are super easy to make. I simply painted the clay pots colors to coordinate with the fabric I had on hand for the head pieces. Then, I painted the wooden balls skin color. I used hot glue to attach the balls to the clay pots. I glued on fabric for the head pieces. I added a little jute rope for a headband for Joseph and a bow for Mary. I used pieces of rafia for the hay in the manger. The baby Jesus is formed from a wad of white muslin with a wooden ball glued on for the head.

I love my newest nativity. It is definitely a little more colorful than the original, but that suits me. I love color and this looks darling on my shelves with the rest of my nativities.
Wednesday, January 18, 2012
JOY
My youngest sister's birthday is in November. Since I had already given her "HOME" for her bridal shower, I needed to come up with another word. I knew she didn't really have any Christmas decorations, so I decided to make her the word JOY. I saw something similar on a throw pillow once a long time ago and thought it would be look great with wooden letters.
I love having the nativity poke through the space in the O.

I made a few more to give away as gifts to a few girls from church.
I made another version for myself. These are 4 feet tall.

I think they add such a nice touch to my front yard! These are so tall that I couldn't make them on my scroll saw. I borrowed my BIL's jigsaw. It was my first time using a jigsaw. It cuts super fast but it makes a ton of noise, and my arm was vibrating like crazy! I thought it might fall off! After spray painting the letters red and the nativity and star white, Mr. Right took over. He screwed them on. Then, he reinforced the wood on the back of each letter to give each piece more support. And then he created these stands for the letters, and staked the JOY into the ground. I loved having such a statement piece in our front yard.
 At night, we had a spotlight up, focused right on the nativity. The letters were very visible at night, even from the end of the street.
I love this new Christmas decoration. In fact, I love it so much, even though its January 18th, we still have it up in the yard :) Well, actually, we just haven't had time to take it down. Mr. Right took the Christmas lights down New Years weekend, but we ran out of time to take down the letters. And since then, its been quite snowy. I will get them down today, but I am excited to pull out this project next year.
I love having the nativity poke through the space in the O.

I made a few more to give away as gifts to a few girls from church.
I made another version for myself. These are 4 feet tall.

I think they add such a nice touch to my front yard! These are so tall that I couldn't make them on my scroll saw. I borrowed my BIL's jigsaw. It was my first time using a jigsaw. It cuts super fast but it makes a ton of noise, and my arm was vibrating like crazy! I thought it might fall off! After spray painting the letters red and the nativity and star white, Mr. Right took over. He screwed them on. Then, he reinforced the wood on the back of each letter to give each piece more support. And then he created these stands for the letters, and staked the JOY into the ground. I loved having such a statement piece in our front yard.

I love this new Christmas decoration. In fact, I love it so much, even though its January 18th, we still have it up in the yard :) Well, actually, we just haven't had time to take it down. Mr. Right took the Christmas lights down New Years weekend, but we ran out of time to take down the letters. And since then, its been quite snowy. I will get them down today, but I am excited to pull out this project next year.
Tuesday, January 17, 2012
Tuesday Treasures: Wooden Couch
I'm going to start posting "treasures" or awesome finds that I'm super excited about on occasional Tuesdays. It won't be every Tuesday, but sometimes. I will be posting items that I score at thrift stores, Ross and Home Goods and those types of stores, and just great buys I find on clearance. Mostly though, it will be thrifted items that I haven't yet repurposed.
This awesome wooden couch I found at Goodwill in the middle of November. I've just been too busy with the holidays until now to do anything with it. I couldn't believe my eyes when I saw it, and you better believe I made a beeline straight to it, just hoping that it wasn't already sold. It was available, and for only $25. I would have paid much, much more.

I have wanted one of these for years. A few years ago on Sara Richardson's design show, I saw her refinish some wooden couches for a family's retreat lake cottage. She painted the wood white and reupholstered the cushions in a modern fabric. I fell in love with the way it looked, and instantly decided that I would keep my eyes peeled for my own. I, of course, had seen a ton of these in thrift stores prior to this. But naturally, as soon as I had a vision of what I could do if I became the proud owner of such a couch, I couldn't find any, anywhere. So, I been casually looking for one every since. I just couldn't believe my luck when I found this beauty, and it was in a Goodwill that's in a newer part of town. Usually I find the awesome antique furniture in the thrift stores in older neighborhoods.

I plan on reupholstering the cushions. The cushions themselves are in great shape, but the current orange fabric is frayed and faded to a light coral in many places. I found the perfect (for me) fabric last week. It's a thick woven upholstery fabric with an awesome spring green and cream design. The green is a perfect match to the green stripe in my living room curtains.
The wood shows a little wear. There are a few scratches and scuffs. I know that I can paint it and they will disappear. But, here is my dilemma. I'm not sure I'm ready to paint it. With all of the turns in the wood, once it's painted, that's it. I can't go back. I can change colors, but it would be nearly impossible to strip the paint down to the bare wood again if I ever wanted that. The main reason I am hesitating is that in my living room I have an enormous antique upright piano which I love.

The piano is a nice dark walnut, and it too is a piece that shows its fair share of wear. The couch would be placed directly across from the piano, where the wingbacks are in the picture below. I will remove the dark leather pieces and put a wingback on either side. If I keep the couch's wood stained, it will mirror the look of the piano a little bit. Plus it will also balance out the visual weight to the room since the rest of the furniture will be light. And since the ceilings are sooooo tall, the visual weight of the furniture is somewhat important. I don't really want to room to look like it's going to float away.

I sorta like the idea of 2 pieces of furniture left in their natural state, directly across from each other. If I keep the couch stained, I will still need to sand it a little bit to smooth out the deep scratches and make it look evenly worn, then add a nice dark wax to smooth everything out. I think it could look nice. Nice and safe, and maybe not that much of a remake.
On the other hand, I also know that I will really love the look of the wood once it's painted. I haven't regretted painting any other piece of furniture. I've always really loved the way paint seems to bring new life to old pieces. So, why am I so hesitant. I think because I'm a little emotionally attached to this couch. I've been looking for one for so long, I am afraid to accidentally mess it up. If I don't like the way it looks painted, I can't go buy another one.
So, what would you do? Would you pick the safe route and leave the wood as is? Or paint it cream, still a fairly safe option since I've seen a wooden couch done in cream and already know it looks fabulous? Or take a big risk and paint it spring green?
I'm still not sure what I will do. I might sew the cushions first and just wait on deciding about the wood for a couple more weeks. Really, deep down, I want to paint the wood, and I want to paint it green. I'm just worried that I need the visual weight of dark brown furniture in the room. Ahhhh, decisions, decisions. But I still LOVE the couch.
Sunday, January 15, 2012
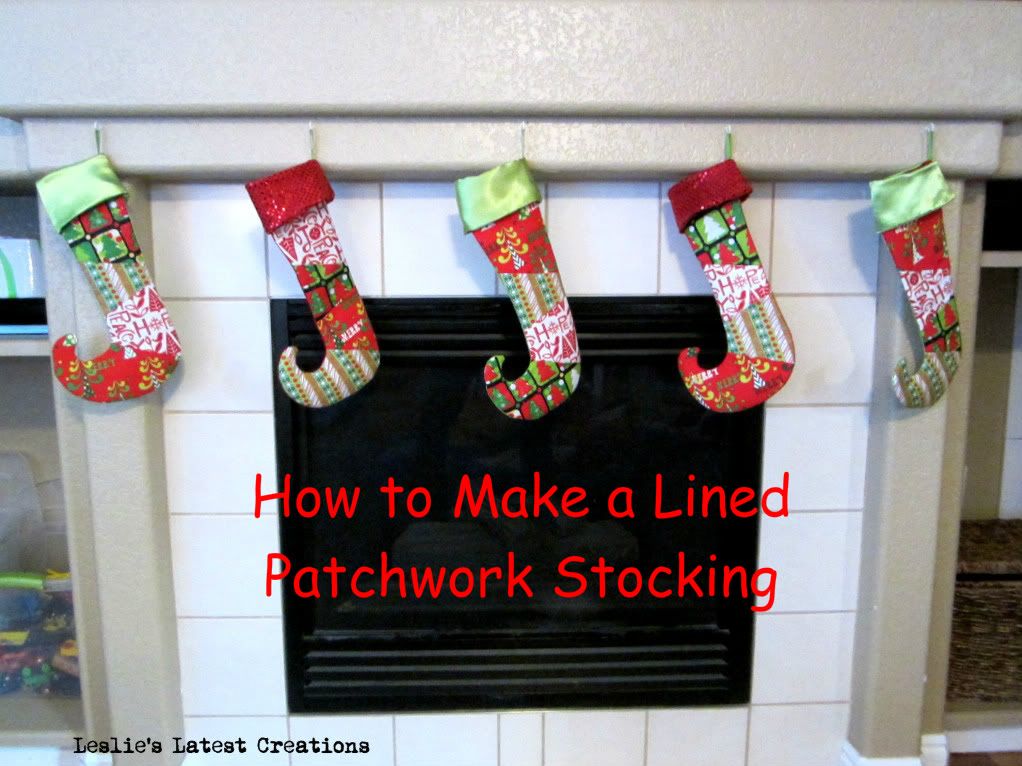
Lined Patchwork Stockings Tutorial
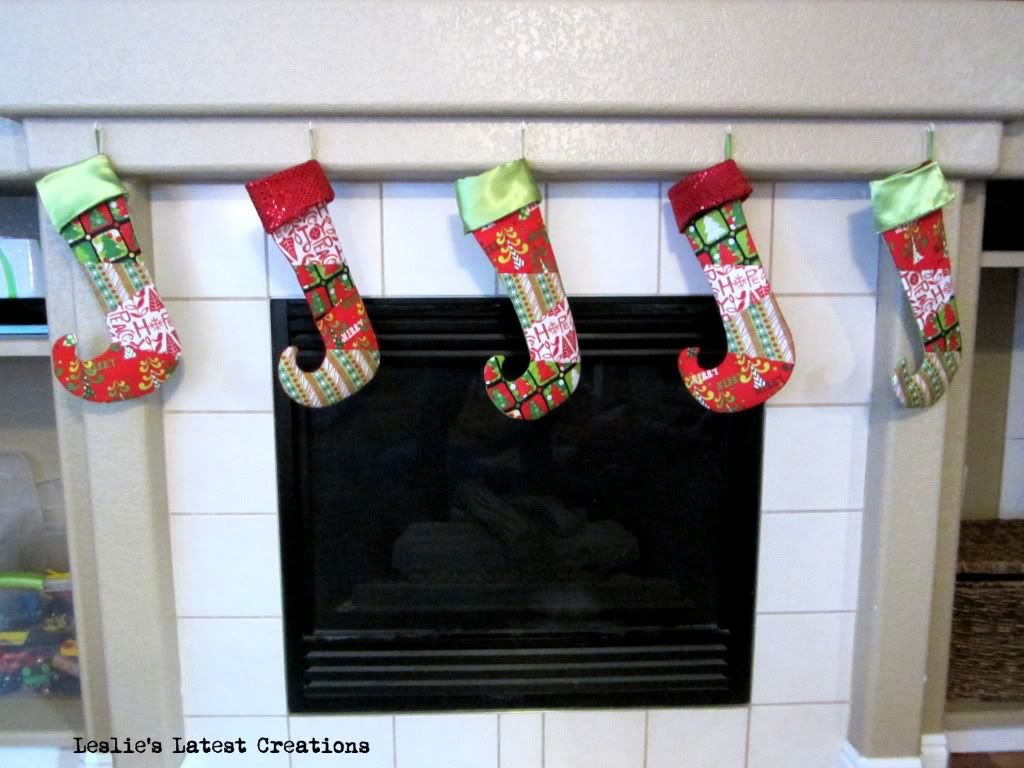
Yup, I'm posting about a Christmas project in January. I just got so behind in December, that I didn't get my projects posted. I decided to go ahead and post about these stockings now, rather than wait until November. If someone wants to make these, they will have an entire year to work on them. I just barely finished these in time for Christmas. I think I finished them on the 23rd, just in time to hang them above the fireplace for the big guy. I love the bright colors: vibrant red and limey green. I also love the elfish curled toes. They really just make me smile. I also love that they are all slightly different. Each has the same 4 fabrics, just a different patchwork combo, and/or a different cuff fabric. They match, and yet they don't. Its totally me.
Want to make your own?
Supplies Needed:
3-5 different fabrics, depending on how many pieces for want. To make 5 stockings, (plus a little extra in case I need to make another in a few years) I needed about 1/4 yard of each.
Cuff fabric- I used green satin and red sequins, but I needed about 1/2 total for all of the stockings.
Backing: I backed mine with red satin. I used about 1 yard and it was plenty.
Fusible Fleece
Lining Fabric
Ribbon
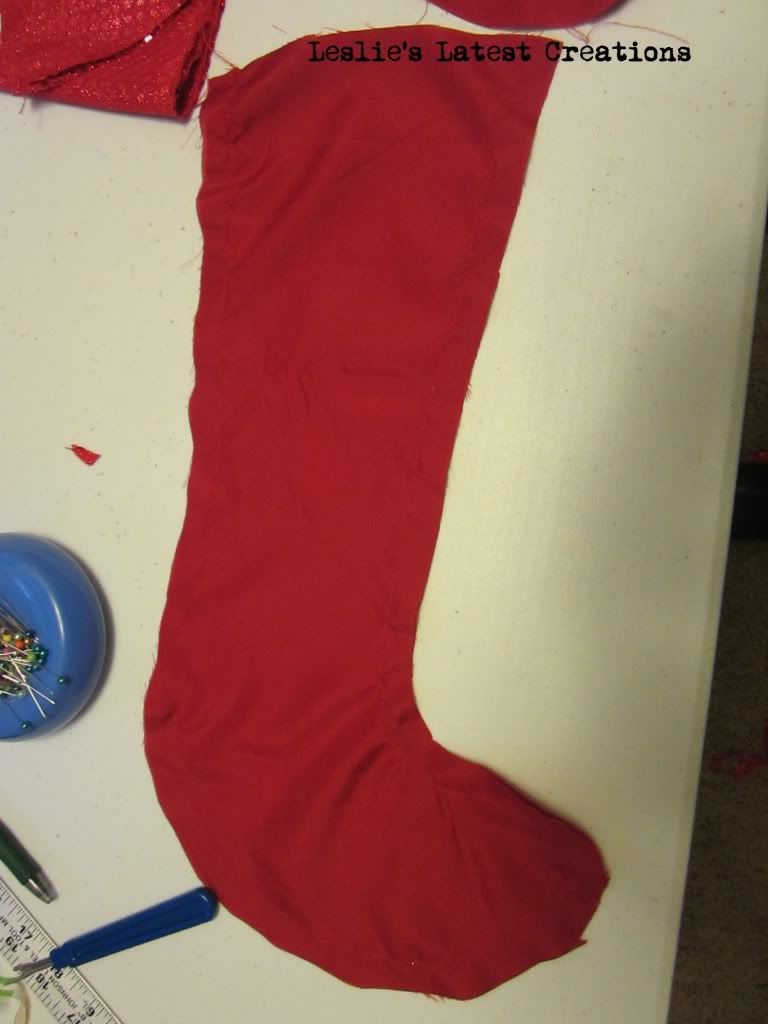
1. First, draw your desired stocking shape. I made mine on the smaller side, since Santa has a stocking budget at our house. These are just big enough to fit a clementine orange, some candy and a few lego guys and matchbox cars.
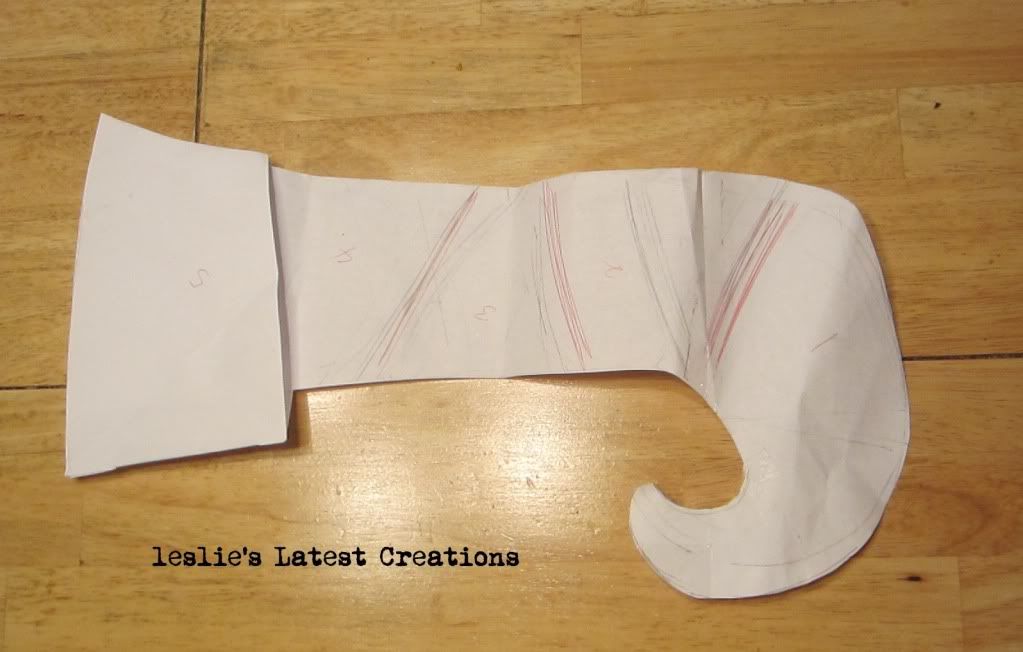
2. After drawing the sock, cut it into the desired patchwork pieces.
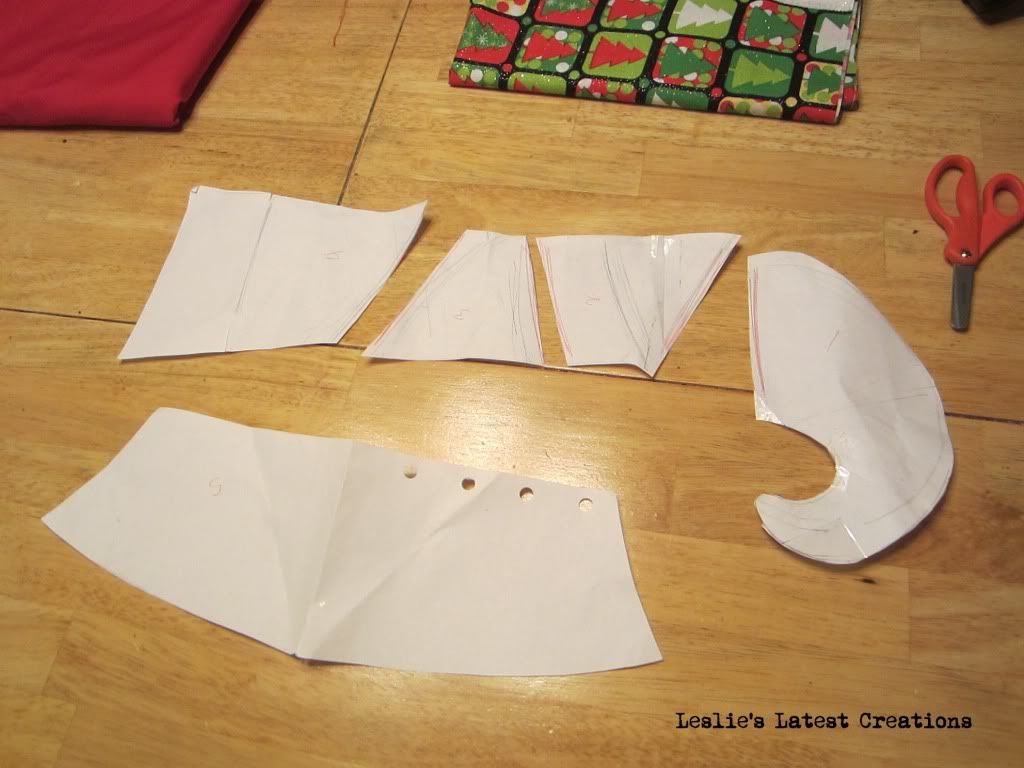
3. Pick coordinating fabrics and cut them out with the patterns you just created.
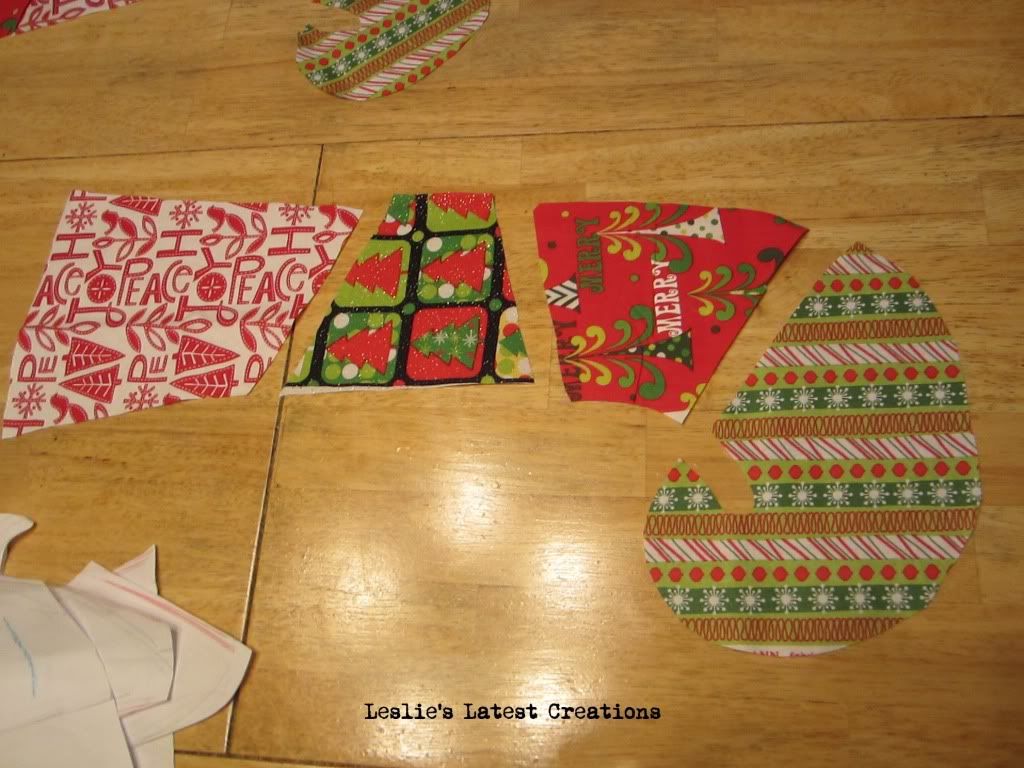
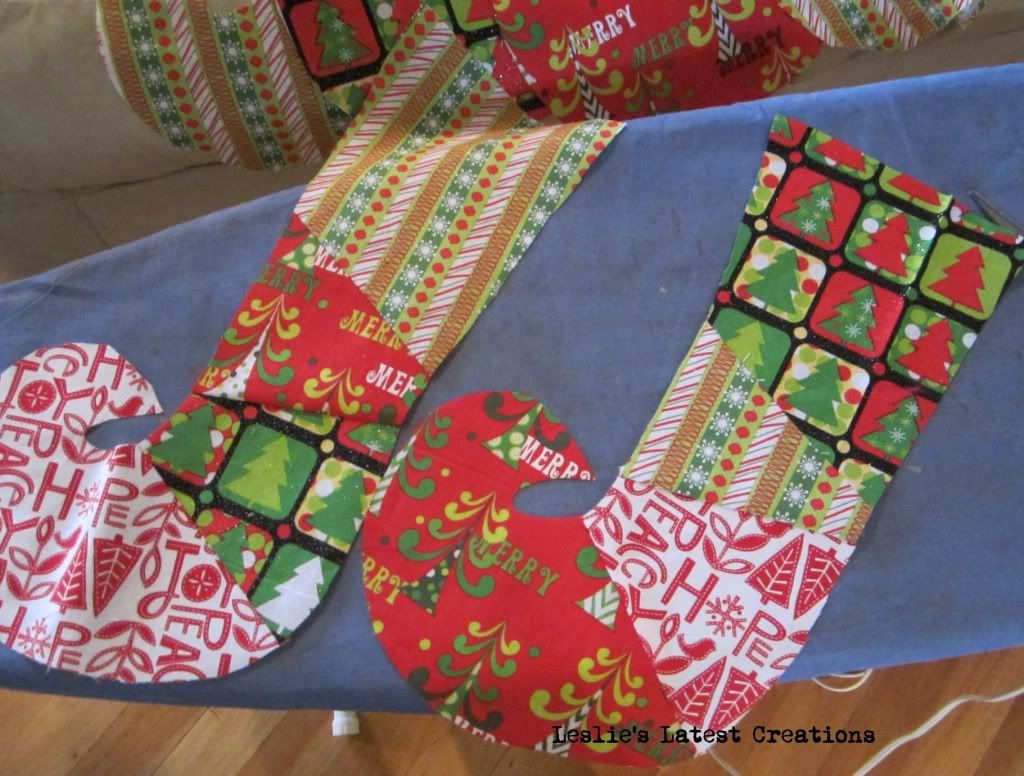
4. Sew them together, using a 1/4inch seam. Press flat.
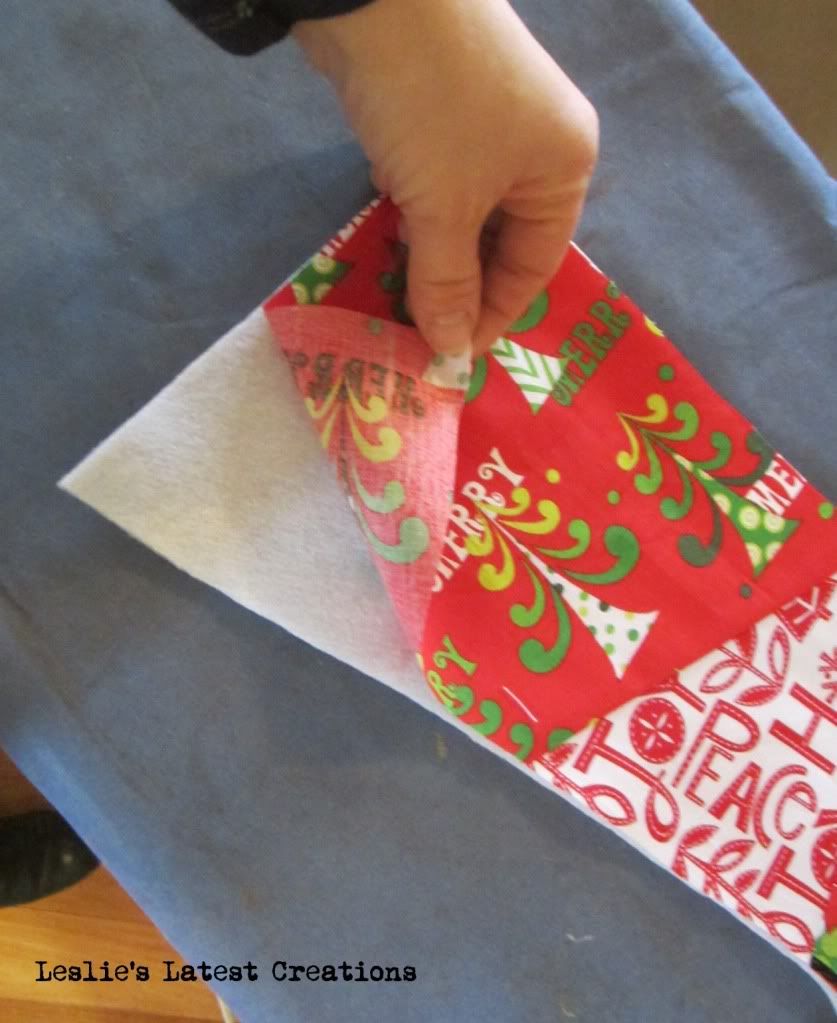
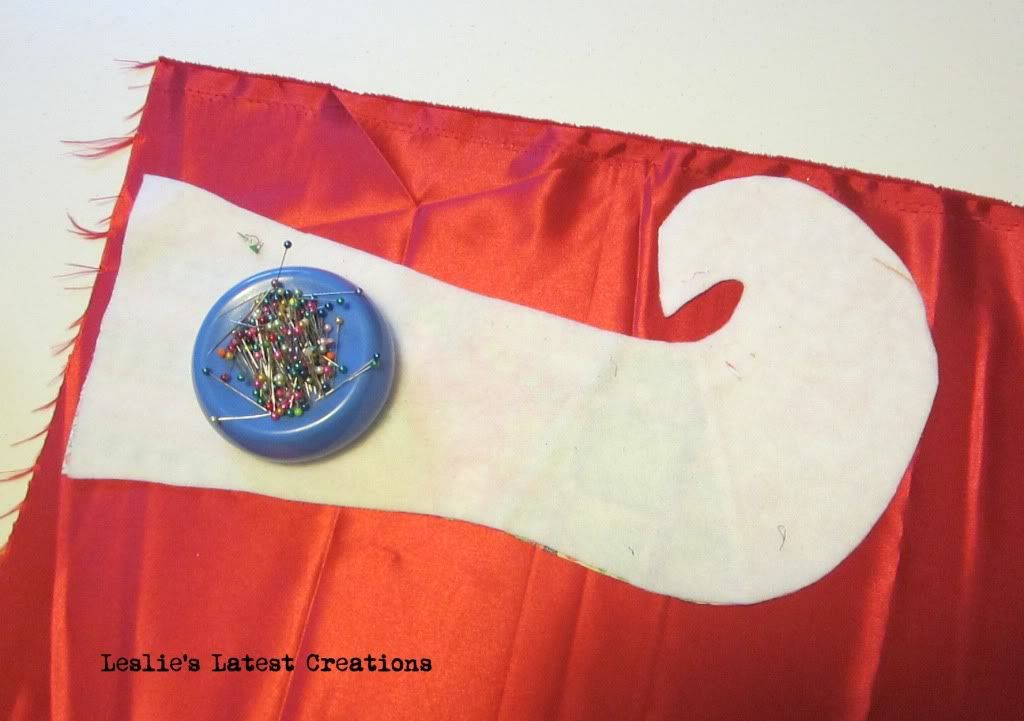
5. Next cut the fusible fleece to the shape of the sock, and iron it to the wrong side.
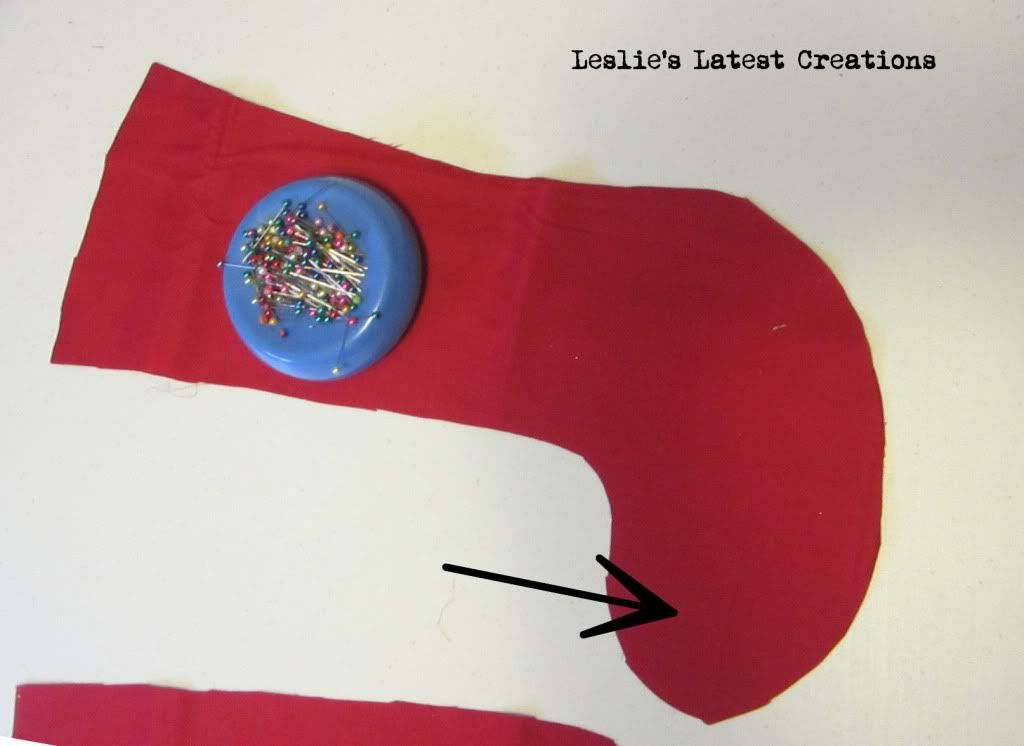
6. Lay the sock face onto the backing fabric and cut out the back of the stocking. With right sides together, sew the patchwork face and the backing together with a 1/4in seam.
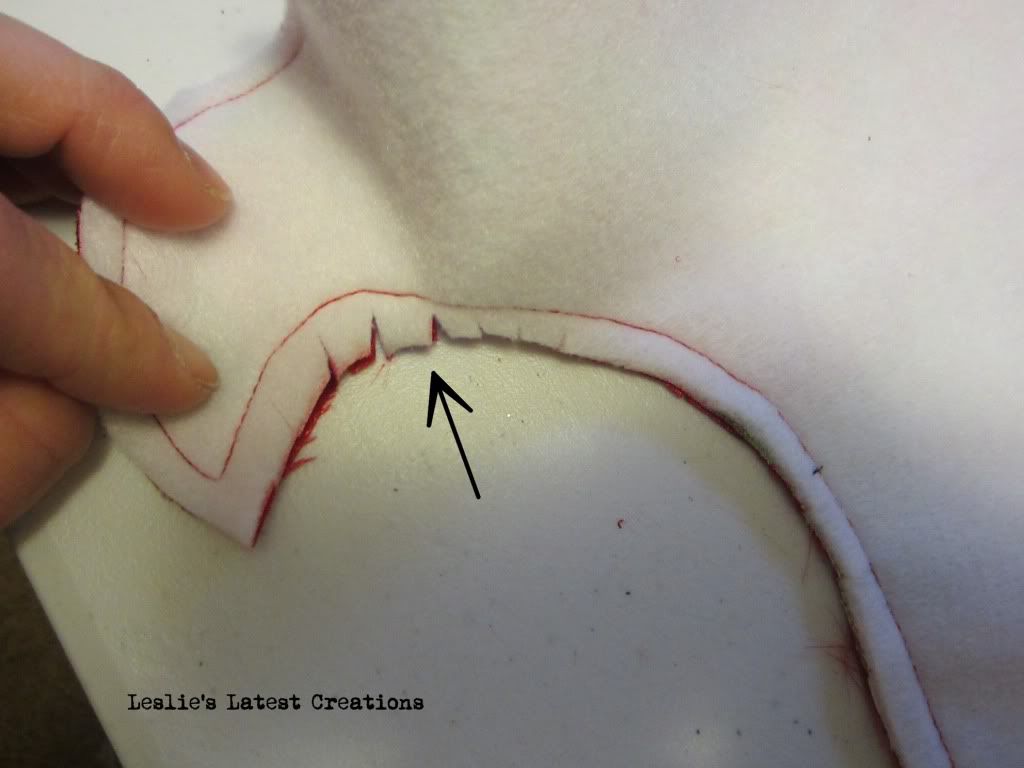
7. Trim the edges.
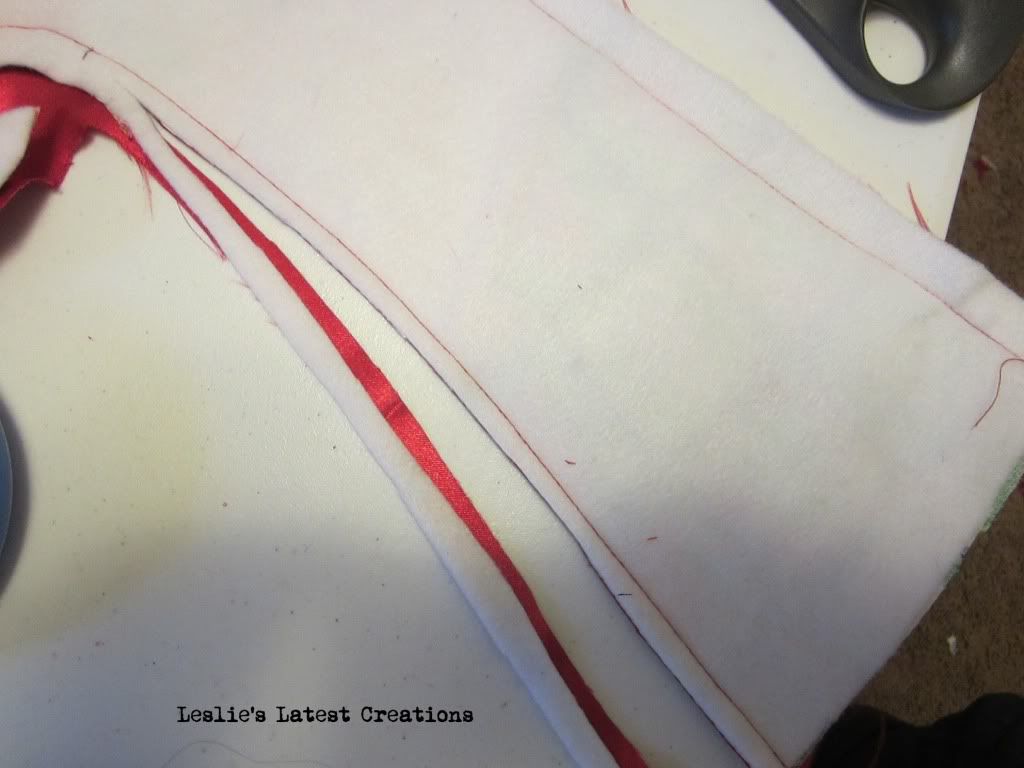
and clip the corners. This is a crucial step if you want the fabric to lay flat after you turn it right-side out, which you should do now. Press.
8. Now, onto the lining. Cut out 2 sock pieces from the lining fabric. The sides are the same, but I modified the toe shape a little on the lining since it won't be seen.
9. Sew the lining pieces together but don't turn it right side out. Leave it as is. Now, stuff the lining with the wrong-sides out, into the stocking. The seamed edges of the stocking should be touching the seamed edges of the lining. This makes the inside of the sock nice and smooth with no fabric edges. You shouldn't feel any of the seamed edges when you put your hand into the stocking.
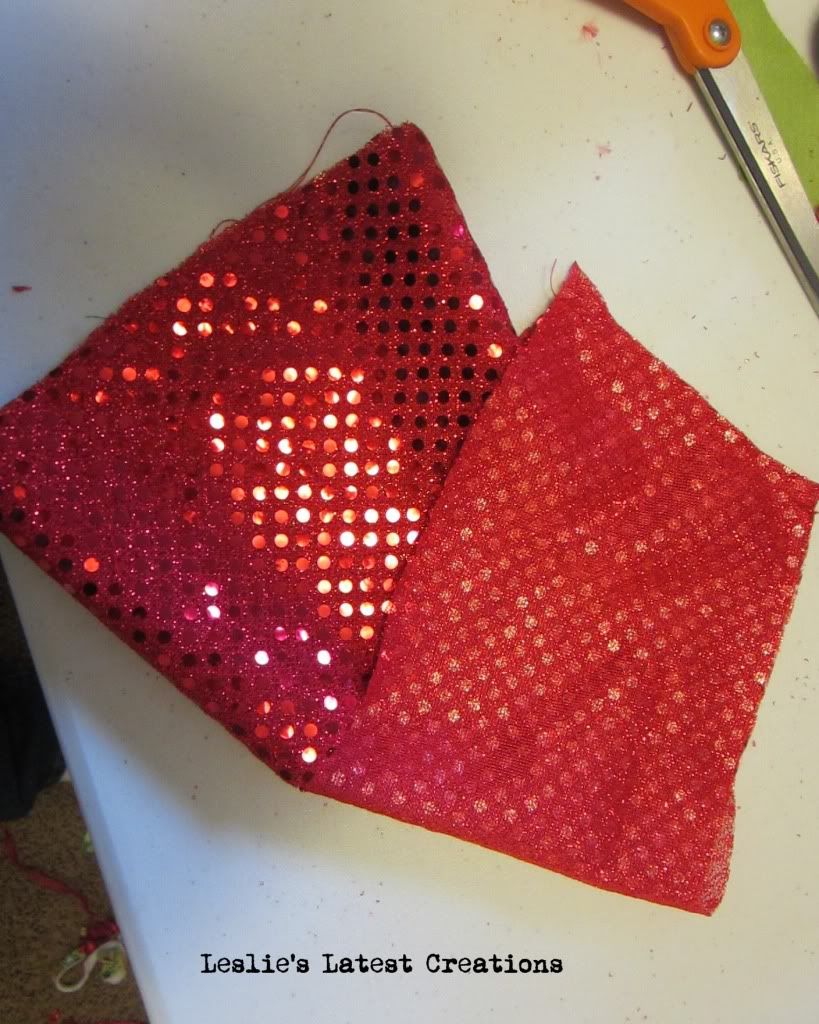
10. For the cuff, cut out 2 pieces of fabric. One will be the cuff and the other will be the cuff facing.

11. Fold each in half, right sides together and sew together. You should have 2 "tubes"
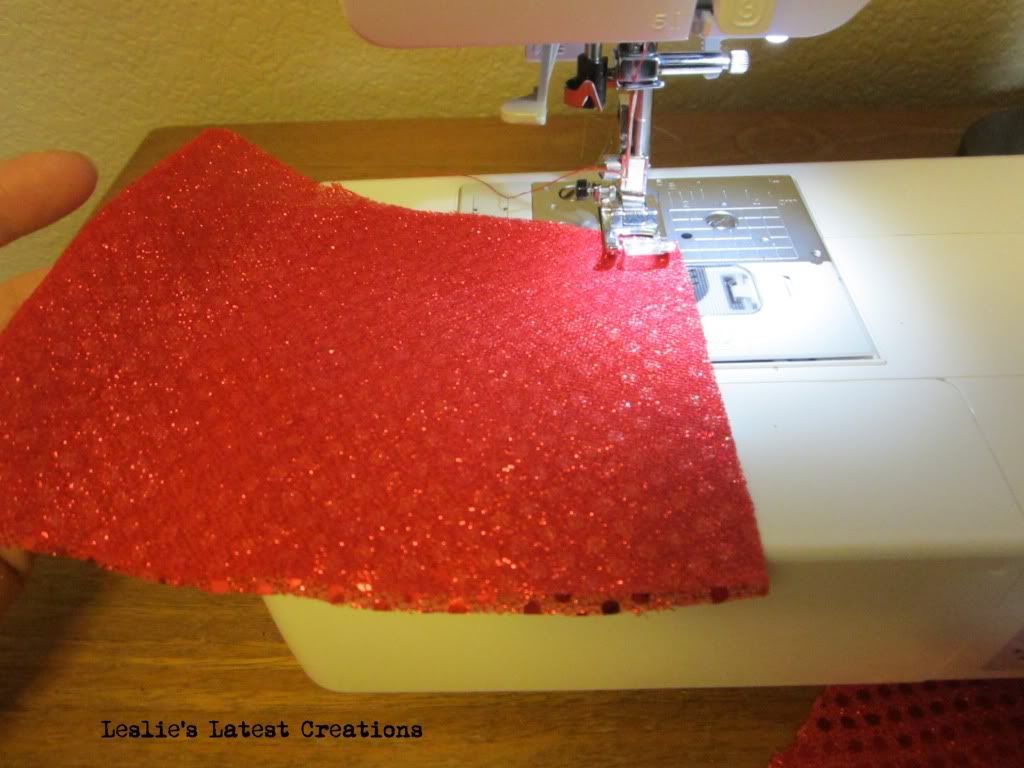
12. Turn one right side out and slip it into the other piece.
13. You should end up with the 2 pieces right sides together. Sew the tubes on 1 side. This will be the bottom of the cuff.
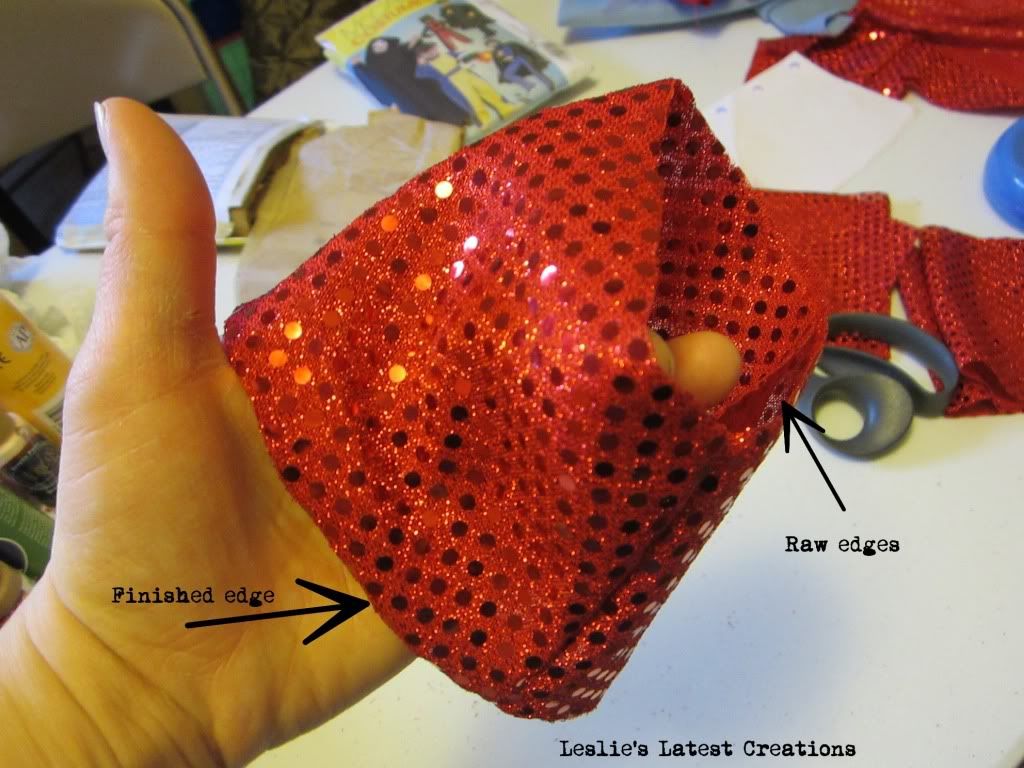
14. Turn it right side out. You should still have a tube, but the outsides and the insides should be the right side of the fabric now. For me, this means that the sequins are now showing. What will be the bottom of the cuff now has a nice finished edge.
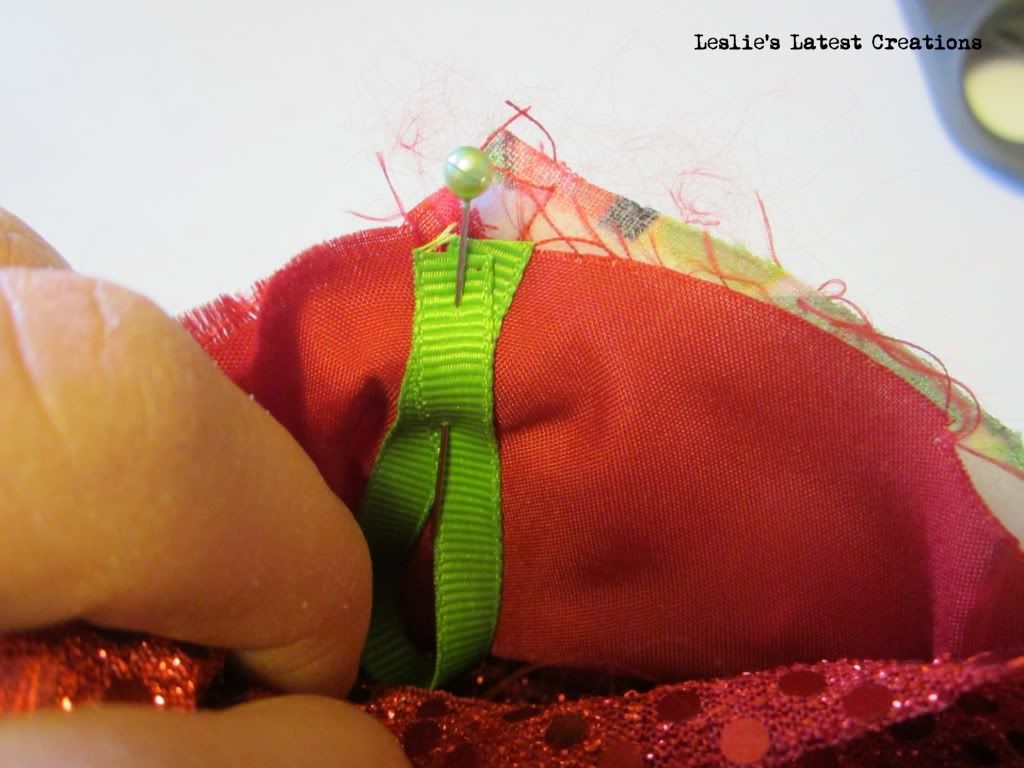
15. Its almost time to sew the cuff to the stocking, but first cut a small length of ribbon, form a loop and pin it to the edge of the stocking, loop side down.
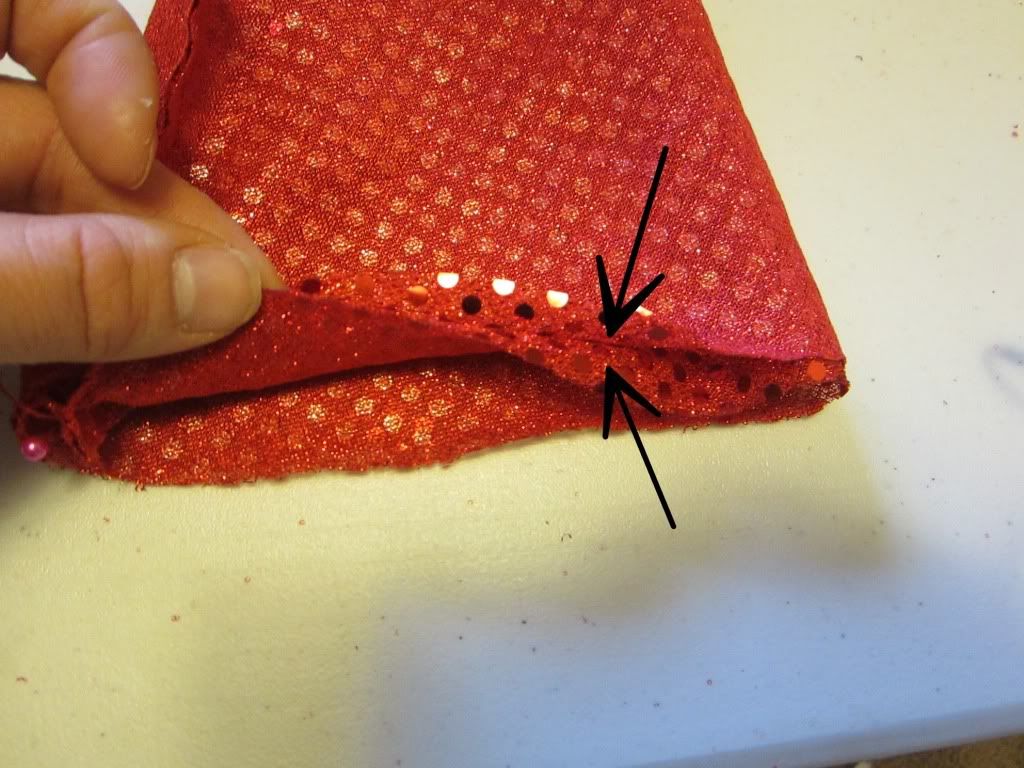
16. Now, slip the cuff into the stocking, with the finished edges on the bottom and the raw edges matching the raw edges of the sock.
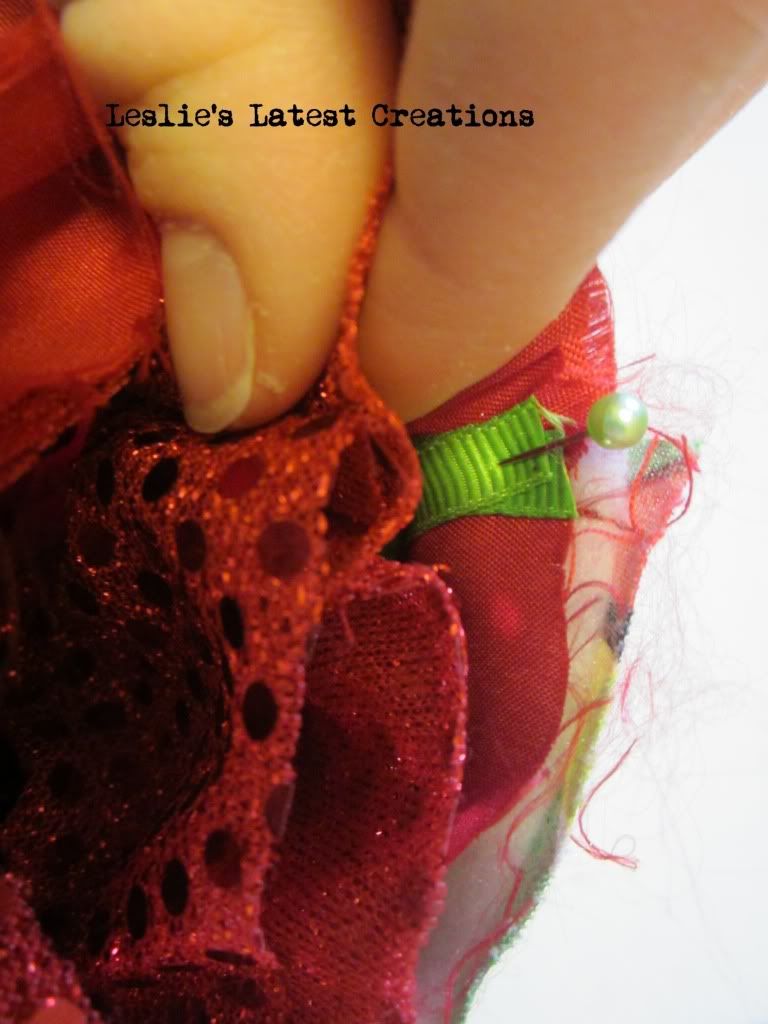
17. Pin in place and carefully sew the cuff to the sock.
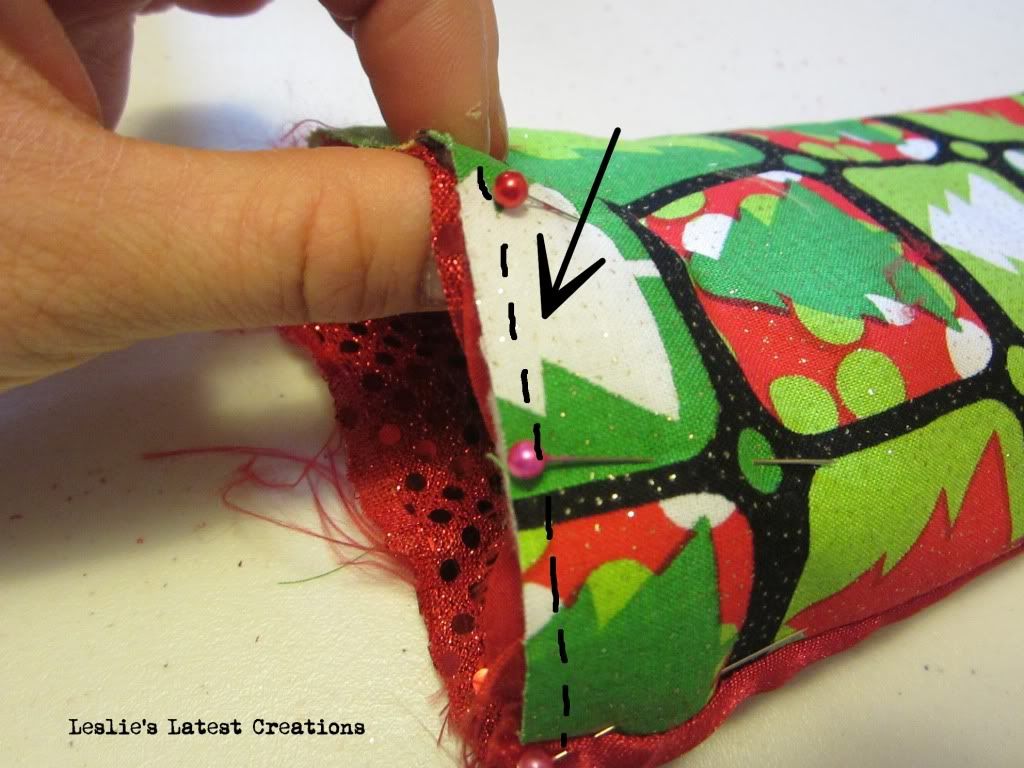
18. When you pull of the cuff, it should look like this.

19. Fold down the cuff, and you are done!!!
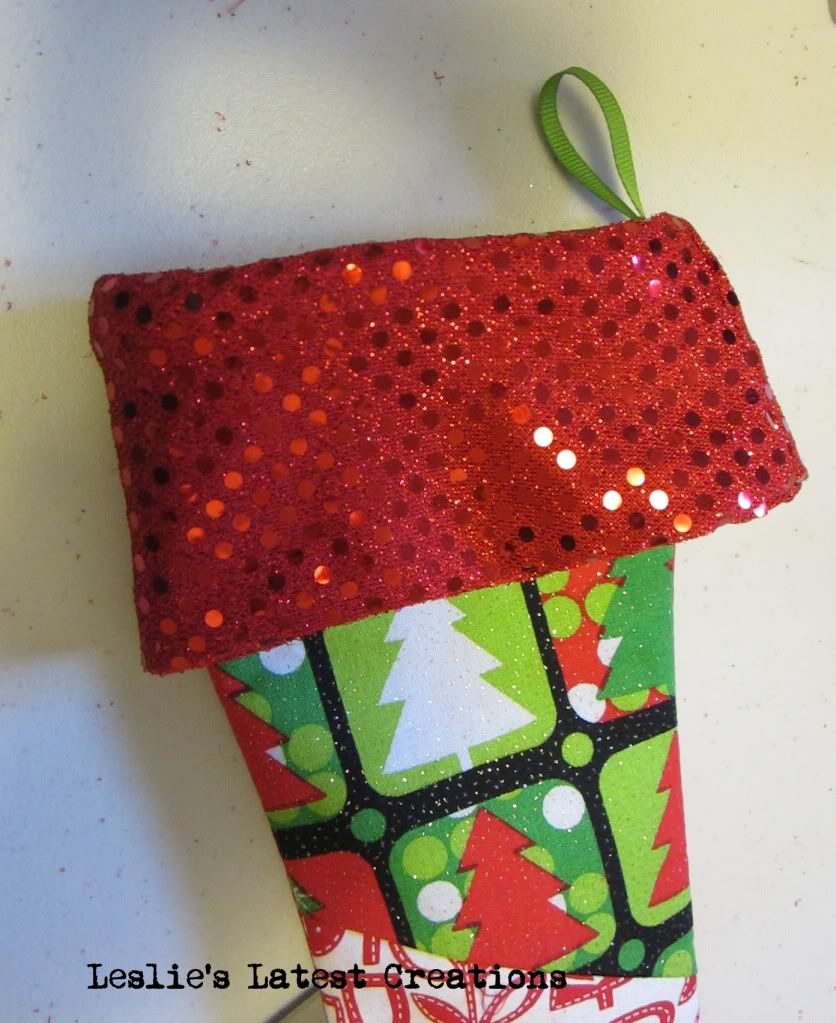
You now have your very own elf shaped, lined, patchwork stockings.
I will be linking up to THESE Fabulous Parties.

Want to make your own?
Supplies Needed:
3-5 different fabrics, depending on how many pieces for want. To make 5 stockings, (plus a little extra in case I need to make another in a few years) I needed about 1/4 yard of each.
Cuff fabric- I used green satin and red sequins, but I needed about 1/2 total for all of the stockings.
Backing: I backed mine with red satin. I used about 1 yard and it was plenty.
Fusible Fleece
Lining Fabric
Ribbon
1. First, draw your desired stocking shape. I made mine on the smaller side, since Santa has a stocking budget at our house. These are just big enough to fit a clementine orange, some candy and a few lego guys and matchbox cars.

2. After drawing the sock, cut it into the desired patchwork pieces.

3. Pick coordinating fabrics and cut them out with the patterns you just created.

4. Sew them together, using a 1/4inch seam. Press flat.

5. Next cut the fusible fleece to the shape of the sock, and iron it to the wrong side.

6. Lay the sock face onto the backing fabric and cut out the back of the stocking. With right sides together, sew the patchwork face and the backing together with a 1/4in seam.

7. Trim the edges.

and clip the corners. This is a crucial step if you want the fabric to lay flat after you turn it right-side out, which you should do now. Press.

8. Now, onto the lining. Cut out 2 sock pieces from the lining fabric. The sides are the same, but I modified the toe shape a little on the lining since it won't be seen.

9. Sew the lining pieces together but don't turn it right side out. Leave it as is. Now, stuff the lining with the wrong-sides out, into the stocking. The seamed edges of the stocking should be touching the seamed edges of the lining. This makes the inside of the sock nice and smooth with no fabric edges. You shouldn't feel any of the seamed edges when you put your hand into the stocking.

10. For the cuff, cut out 2 pieces of fabric. One will be the cuff and the other will be the cuff facing.

11. Fold each in half, right sides together and sew together. You should have 2 "tubes"

12. Turn one right side out and slip it into the other piece.

13. You should end up with the 2 pieces right sides together. Sew the tubes on 1 side. This will be the bottom of the cuff.

14. Turn it right side out. You should still have a tube, but the outsides and the insides should be the right side of the fabric now. For me, this means that the sequins are now showing. What will be the bottom of the cuff now has a nice finished edge.

15. Its almost time to sew the cuff to the stocking, but first cut a small length of ribbon, form a loop and pin it to the edge of the stocking, loop side down.

16. Now, slip the cuff into the stocking, with the finished edges on the bottom and the raw edges matching the raw edges of the sock.

17. Pin in place and carefully sew the cuff to the sock.

18. When you pull of the cuff, it should look like this.

19. Fold down the cuff, and you are done!!!

You now have your very own elf shaped, lined, patchwork stockings.

I will be linking up to THESE Fabulous Parties.
Friday, January 13, 2012
FINISH IT Fridays: BYU Wall Quilt
When it comes to my craft room, most of the time, it looks like a hurricane tore through it. Part of the problem comes from me not putting things away when I am finished, and the other part happens because there is nowhere for me to put these items away. My closet is stuffed to the brim with fabric and half finished projects and supplies. I have an ADD tendency when it comes to projects. I get really excited to make something, purchase the items needed, maybe get started on it, and then I never get back to it. Or, I might get back to it months later. I also loves to browse the clearance racks for deals. I have lots of impulse craft purchases. I might buy something that it such a great deal that really, how could I pass it up, when I don't have any clear idea of a purpose or a deadline. Thus, my craft room is a bit cluttered and stuffed.
To help with this problem, one thing I want to work on this year is finishing up these partially completed projects (I will also be sorting and tossing items I no longer need as well as organizing my space). To give myself an incentive, I have decided that I will work on projects as part of blog series: FINISH IT Fridays. I will post at least one Friday a month, possibly more but with no firm schedule, a project that I have finally finished. It will be something that I have just for some reason not completed. I will complete the project and post the finished product.
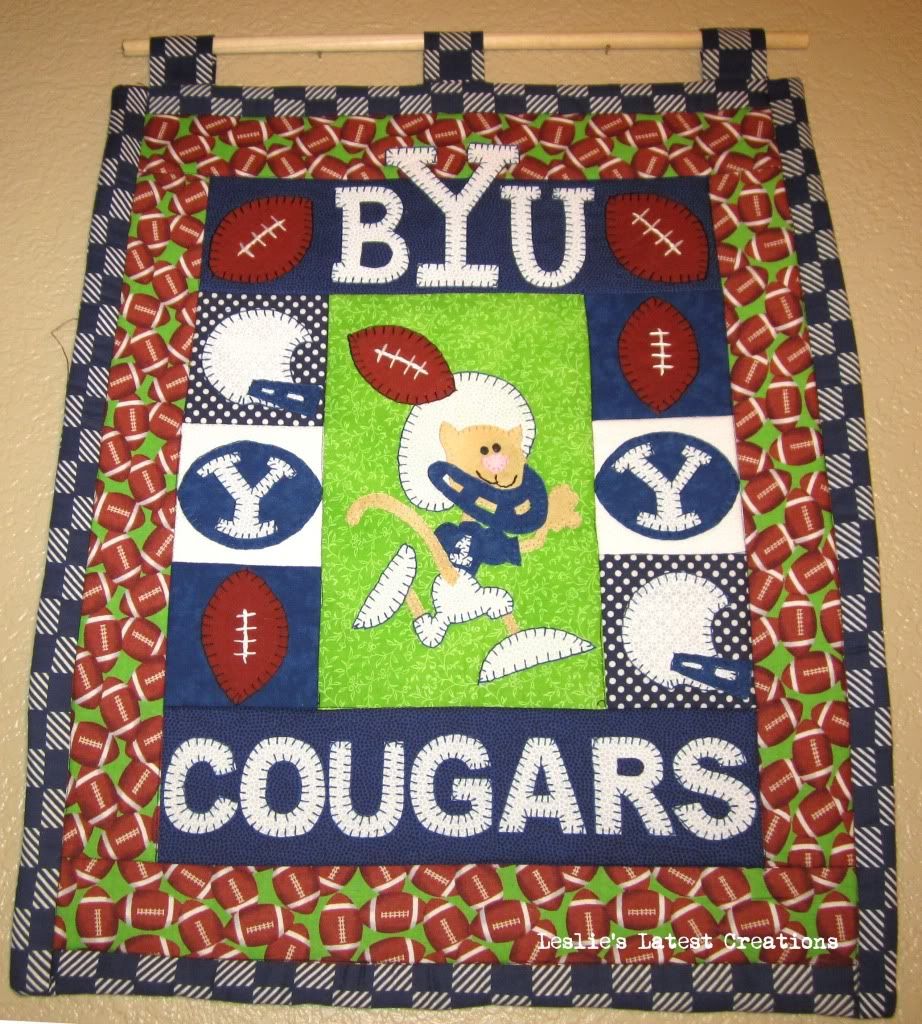
For this Friday, I finished a wall quilt. Back when I first started this blog, I was just finishing some monthly wall hanging quilts. I have a spot in my kitchen where I change them out monthly. I only made 11, with the idea that June and August could share a Summer themed quilt.

My September quilt has a back to school theme.

This is great in theory. However, our school district has the kids going back to school the first week of August. It just doesn't make sense to put out the "Back to School" quilt in September when the kids have already been back to school for an entire month. So, last year, I hung up the Back to School September quilt in August, instead of reusing my June quilt. Hence, I didn't have a quilt for September anymore. Even though school starts here in August, football still starts in September, and with a house full of boys, football season is very well loved here. I decided to make a football quilt for September, and I couldn't resist using our favorite team.
I got started on this back in August, but somehow I just didn't get it done before the end of September. Then, since my deadline was passed, its been sitting on a shelf in my craft room, waiting for me to finish it. I decided that today would be that day and now, I will have something new to enjoy this September.
I will be linking up to these Fabulous Parties All week long.
Subscribe to:
Posts (Atom)