Showing posts with label furniture. Show all posts

Tuesday, January 17, 2012

Tuesday Treasures: Wooden Couch

I'm going to start posting "treasures" or awesome finds that I'm super excited about on occasional Tuesdays.  It won't be every Tuesday, but sometimes.  I will be posting items that I score at thrift stores, Ross and Home Goods and those types of stores, and just great buys I find on clearance.  Mostly though, it will be thrifted items that I haven't yet repurposed. 
This awesome wooden couch I found at Goodwill in the middle of November.  I've just been too busy with the holidays until now to do anything with it.  I couldn't believe my eyes when I saw it, and you better believe I made a beeline straight to it, just hoping that it wasn't already sold.  It was available, and for only $25.  I would have paid much, much more.  
I have wanted one of these for years.  A few years ago on Sara Richardson's design show, I saw her refinish some wooden couches for a family's retreat lake cottage.  She painted the wood white and reupholstered the cushions in a modern fabric. I fell in love with the way it looked, and instantly decided that I would keep my eyes peeled for my own.   I, of course, had seen a ton of these in thrift stores prior to this.  But naturally, as soon as I had a vision of what I could do if I became the proud owner of such a couch, I couldn't find any, anywhere.   So, I been casually looking for one every since.  I just couldn't believe my luck when I found this beauty, and it was in a Goodwill that's in a newer part of town.  Usually I find the awesome antique furniture in the thrift stores in older neighborhoods. 

I love that this couch is not only wooden, but also wingback.  I plan on putting it in my living room with my pair of slipcovered wingback chairs.  
I plan on reupholstering the cushions.  The cushions themselves are in great shape, but the current orange fabric is frayed and faded to a light coral in many places.  I found the perfect (for me) fabric last week.  It's a thick woven upholstery fabric with an awesome spring green and cream design.  The green is a perfect match to the green stripe in my living room curtains.  
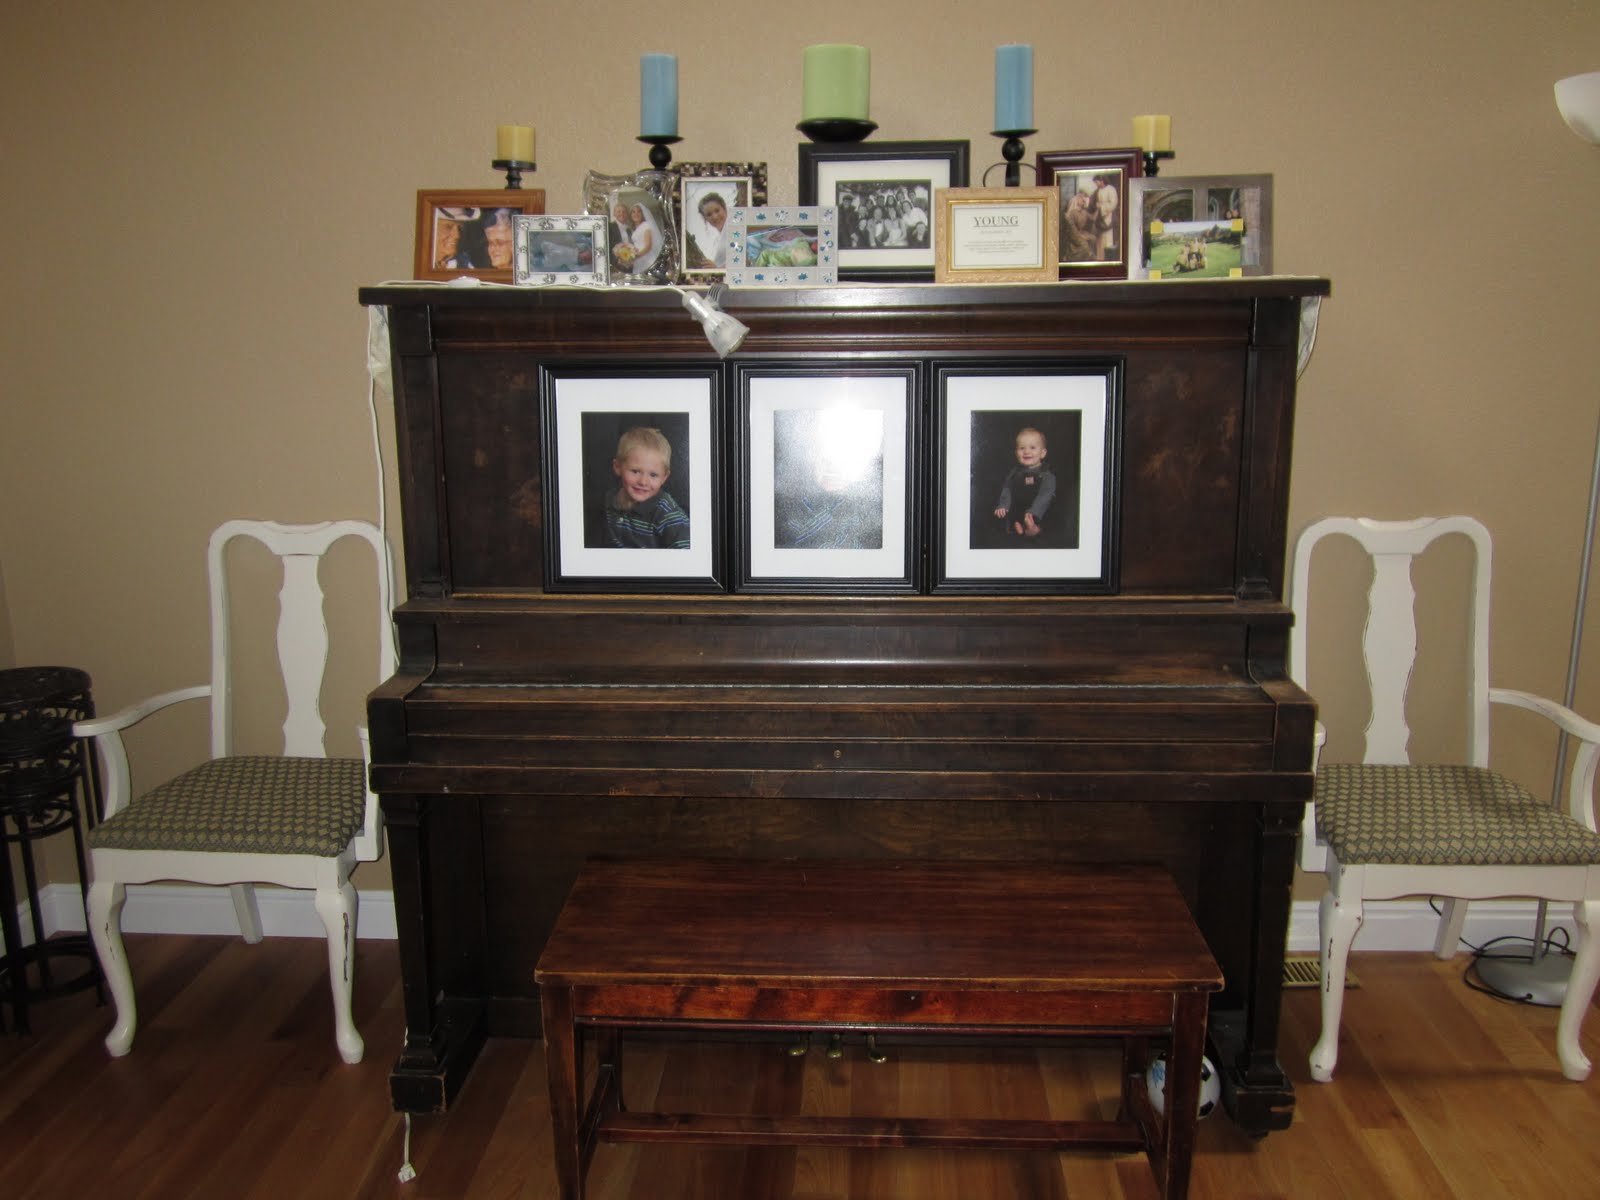
The wood shows a little wear.  There are a few scratches and scuffs.  I know that I can paint it and they will disappear.  But, here is my dilemma.  I'm not sure I'm ready to paint it.  With all of the turns in the wood, once it's painted, that's it.  I can't go back.  I can change colors, but it would be nearly impossible to strip the paint down to the bare wood again if I ever wanted that.  The main reason I am hesitating is that in my living room I have an enormous antique upright piano which I love.

The piano is a nice dark walnut, and it too is a piece that shows its fair share of wear.  The couch would be placed directly across from the piano, where the wingbacks are in the picture below.  I will remove the dark leather pieces and put a wingback on either side.   If I keep the couch's wood stained, it will mirror the look of the piano a little bit.  Plus it will also balance out the visual weight to the room since the rest of the furniture will be light.  And since the ceilings are sooooo tall, the visual weight of the furniture is somewhat important.  I don't really want to room to look like it's going to float away.

 I sorta like the idea of 2 pieces of furniture left in their natural state, directly across from each other.  If I keep the couch stained, I will still need to sand it a little bit to smooth out the deep scratches and make it look evenly worn, then add a nice dark wax to smooth everything out. I think it could look nice.  Nice and safe, and maybe not that much of a remake.  
On the other hand, I also know that I will really love the look of the wood once it's painted.   I haven't regretted painting any other piece of furniture.  I've always really loved the way paint seems to bring new life to old pieces.  So, why am I so hesitant.  I think because I'm a little emotionally attached to this couch.  I've been looking for one for so long,  I am afraid to accidentally mess it up.  If I don't like the way it looks painted, I can't go buy another one.
So, what would you do?  Would you pick the safe route and leave the wood as is?  Or paint it cream, still a fairly safe option since I've seen a wooden couch done in cream and already know it looks fabulous?  Or take a big risk and paint it spring green?
I'm still not sure what I will do.  I might sew the cushions first and just wait on deciding about the wood for a couple more weeks.  Really, deep down, I want to paint the wood, and I want to paint it green.  I'm just worried that I need the visual weight of dark brown furniture in the room.  Ahhhh, decisions, decisions.  But I still LOVE the couch.

Wednesday, July 27, 2011

Slipcovered Wing Chairs

Look at this chair.  Isn't it beautiful? 
For a while I have been stewing about my furniture arrangement in my living room.  I've wanted a couple of chairs to add to the space to fill it out a bit.  So, I've been casually looking the past few months for the perfect chairs at the right price.  Now, I'm sure that if I was better at escaping to the thriftstores and rummage sales daily or even weekly, I would have found something long before now.  However, shopping with 3 kids, active boys no less, is not quite on my favorite things-to-do list.  Luckily I scored on a pair of wing chairs recently.

 I knew they would be perfect in the space with a little transformation.  I love the lines of the chair and the legs.  The cushions are in great condition.  The blue fabric isn't even in that terrible of condition.  Its a little thin and worn in places but there were no holes or snags.   However, I don't like the blond stain on the legs.  If it had been a natural stain, I could have lived with it, but I really don't like opaque blond stained wood on anything.
 So, my transformation vision included painting the legs dark brown for a start.
The second half of my transformation plan involved giving the actual chairs a face lift.  Do you follow Miss Mustard Seed?  I adore her blog.  A while ago she wrote a tutorial series on sewing slipcovers, and I have been anxious to try my hand at them.  I knew these chairs would look fantastic in my living room covered in a nice natural canvas.  As per Miss Mustard Seed's instructions, I used painters' canvas drop clothes that I bleached and washed before sewing.  Then, after pinning and sewing and pinning and sewing for many hours, I am finished!   For instructions on making your own slipcover, please head over to Miss Mustard Seeds blog and watch her 6 part video series on sewing slipcovers.  Here is the link for the first video.

I just love the way these chairs turned out.  I can't stop admiring my handiwork.  I couldn't be happier!

Little pleats at the bottom edge.  Its fun to have a feminine touch here and there in such a boyish home!


I put buttons on the backs to close up the sides of the slipcover. 


I love having wing chairs in my room with my antique piano.   I also really love having more cream in the room.  When I first painted the chairs flanking the piano cream, I was worried that they looked weird since all of the other painted chairs in my house are various shades of blue and green, even though I loved the addition of the cream to the room.  Adding these wing chairs completes the look.   My living room is slowly starting to come together.  I will eventually be painting that corner curio cabinet (maybe green?), and I really could use a coffee table or ottoman in the room now.  I've also got a stack of fabric and pillow forms just waiting for me to take the time to sew into throw pillows for this room.  Maybe next week...  For now, I am going to enjoying curling up in one of the wing chairs reading a good book.

Tuesday, July 19, 2011

Project Restyle #3, Facelift for 2 Chairs

Since I recently found my old camera, I was able to find this picture.

This is what those chairs looked like when they were red.   They weren't bad; they were just a little dingy and needed a facelift.
 Now, after a fresh coat of paint and new fabric on the cushions, they look like completely new chairs.  

I still love the way these chairs look flanking my piano.  Added bonus, the one of the left is a new time-out spot for Anakin.   I didn't really plan of using the chairs for actually sitting in very often.  However, my piano is large and when a little person is sitting down, the piano blocks the view of the rest of the room.  Its a perfect spot for a little boy to sit and think without distractions.

Saturday, June 25, 2011

Facelift for Two Chairs

 I snagged these two chairs from my SIL when she was getting rid of them a while ago.  They've been sitting in my shed for months waiting for me to decide to work on them.  They were painted a bright red and the seats were covered in a red check fabric.  The fabric was old and needed to be replaced but the red was perfectly fine.  However, I don't have any red in my house at all, so I decided to paint and reupholster the chairs.   My before pics are sadly lost on my old camera, but here are the after photos.  I spray painted the chairs cream then sanded the edges for a distressed look.  I redid the seat cushions in a green and taupe fabric.
I'm quite pleased with the way these chairs look next to my piano.  For the most part, with the chairs against the wall, they won't get a lot of use.  But they will provide extra seating that's easy to pull into the area when we need it.

Monday, April 11, 2011

I've Found a Twin!


Imagine my delight when I saw this chair will thrifting last week for only $2.99!  I'm giddy with excitement!  Of course I had to snatch it up, even though there is a small hole in the caning because look at it next to my Vanilla Oasis chair.
 They have they same scale and same look.  At first glance, they even appear identical (or they will once I redo this one!)
 There are of course some differences.  The size of the caning is different.  I might try to redo the caning.  I've been researching it online, but I'm not sure if I'm up for that challenge yet.  If I do replace it, then I could just buy the same size that I have on Vanilla Oasis.   The backs of the chairs are slightly different too.

And the legs are different.  But the overall look of the chairs is identical.  
So, now I pose a few questions.  Should I try to make these chairs look as identical as possible, or should I change things up a little?  When I just had Vanilla Oasis, she was going to live in my living room area.  But, now that I have 2 similar chairs, I have a great place in my family room where they could both be placed near each other with a small table and lamp in between them. 
I could definitely paint the chairs the same color.  But  I am stumped when it comes to the upholstery.  I don't quite have enough left-over camel colored fabric from Vanilla Oasis to make a perfect cushion. And I bought the fabric a long time ago, so I can't just buy more.  I'm close to having enough, so I could maybe seam a couple of the scrap pieces together for the seat as well as the underside of the cushion.  The seams would be in places that would be hidden, so no one would know but me.  But still.  The perfectionist in me is having a hard time with that thought.  My other option is to use a coordinating fabric.  This would make the chairs look like fraternal twins or just sisters, instead of identical.  
I happen to already have this tan and blue striped fabric.  Notice that it does coordinate with the camel.  I also have some matching solid blue that I could use for the piping.  Then, I could make throw pillows for both chairs out of the camel, blue, and the tan and blue striped.  
So,  I really need your opinions. Should I somehow patch the leftover camel-colored fabric together to make the cushion and seat?  Or, should I use this other fabric for the upholstery?   Please help!
Does it make a difference to know that in the family room I have a shag rug with chocolate brown, blue and tan colors?  Or that the side table and the coffee table are going to be painted that light blue color?
Please, give me your opinions!  Thanks!

Thursday, April 7, 2011

Project Restyle #2: Ugly Orange Chair Becomes Vanilla Oasis

Yeah!  I am finished with my Ugly Orange Chair redo.   Now, instead of the ugly orange chair, I am calling her The Vanilla Oasis.  Isn't she beautiful?  So simple and elegant.  
 Remember what she used to look like?


This is her new look.  Very light and very neutral.  I don't usually go with such a neutral color scheme, but since this project was so time intensive for me, I wanted a neutral chair that I could move from room to room  easily without having to take her apart and repaint every time.  So, when I move her around, I plan on just changing out the pillows. 


So, how did I refinish her?  
A. First I unscrewed the seat. 
B. Then I ripped off the black backing. 

 Once I was down to the wood, I lightly sanded the surface and then spraypainted it with Rust-oleum Heirloom White.  This is a very warm white.  I didn't want pure white because I thought that it would make it too stark. 
Next, I started on the upholstery.  I had two pieces to recover, the seat and the cushion that goes on top.  I started with the seat. 
 I had to pull out all the staples holding the old orange velvet. I used needle-nosed pliers along with a flathead screwdriver. 
Once I had the old fabric unfastened, 
 I took the velvet over to my camel-colored fabric and used it as a pattern.  I cut out the square I would need. 

Then, I began stapling it to the seat frame. Pull the fabric till it is taut.  Then put in a couple staples to the north, then the south, then the west, then the east, gradually working your way around the edge.  This way, the fabric will be pulled evenly and straightly on your seat.   Trim away the excess fabric once you are finished. 
 Next, I needed to make the piping to go around the edge.  
 I cut a thin strip of the camel fabric. 
 I inserted the cord into the middle of the strip and sewed it shut using my zipper foot. 
I now had a long piece that looked like this. 
 Now using my staple gun, I stapled it to the edge of the seat, going all the way around. 
 Flipped the seat right-side up and set in onto the chair.  Screwed it into place. 
Now I was finished with the seat and it was time to tackle the cushion!
 The first thing I did was undo the zipper and take out the cushion. 
Then I turned the cover inside out to study the construction.  From here on out, I just tried to made the cushion cover look exactly like the orange cover.  I took it apart and used the orange pieces as my pattern.   I knew the first thing I would have to make was the side piece with the piping, and the zipper.
 I sewed my zipper onto a strip 

 After the zipper was on a strip, I sewed another strip (A) to the zipper piece (B).  After that, I sewed the cord onto the sides (C).
Here is a view from the right side. 
After this, I cut out the top and bottom of the cushion cover, using the old pieces as the pattern.  I sewed them on to the side panel I just made.  
(I got a little frustrated at this stage and stopped taking pics in my frustration.  Sorry.  I didn't measure the length of the side panel correctly and I ended up having to pick things apart and add fabric to the panel and then re-sew it).  Finally I was finished.
Now, I will enjoy the look of my new chair. 

LinkWithin

Related Posts Plugin for WordPress, Blogger...