Thursday, March 31, 2011

Ugly Orange Chair Sneak Peak

Wanna see what I've been working on this week?  
Introducing, The UGLY ORANGE CHAIR.  Original name huh!
This chair was given to us a few years ago and I love it.  By that, I mean I love its potential.  I think its circa 1950s and has beautiful lines.  But,  the upholstery is not so beautiful.  I like the color orange a lot, but worn out orange velvet doesn't really speak to me.  And, the wood looks a little worn.  It is scratched and chipped.  Really, it has needed a facelift. 
 I've known this forever.  But, I've never before tackled such a big upholstery project, and I love this chair so much that I have been afraid that by trying, I would accidentally ruin it.   I have finally bolstered my courage and begun!

  Here is just a sneak peak at part of what I've done so far.... Stay tuned to see more of the Ugly Orange Chair over the next few days!

Wednesday, March 30, 2011

Green Ruffle Shirt

So, when I asked my SIL Shelley which wooden letter word she would like for her birthday, after some thought, she asked for a "green embellished tee!"  I was quite shocked and quite flattered.   That someone other than myself would like to wear something I have sewn, makes me feel good.  Maybe that  means my clothing items look more boutique-like and less home-sewn than I thought ;)
So to begin with,  I either had to find some nice green jersey knit at my fabric store or some premade green tees in a nice color.  Strike out time!  My local fabric store is really heavy on the quilting, flannel and fleece products.  But as for nice apparel fabrics, talk about striking out regularly.  Its hardly even worth shopping there half the time. Of course, I didn't find any green knits that I likes.  At the clothing stores, it also wasn't exactly a breeze.  It seems like the green of choice this spring is an ugly yellowish olive color that I don't think would be super flattering on very many people.  Finally I found these basic green tees.  Perfect. 
 Except for these pockets.  I knew I definitely had to find a way to hide that pocket. 
So, after thinking about the design for a while, I decided to make a ruffle shirt similar to Sachiko's ruffle shirt 2.  So, I copied her instructions and cut out 2.5 inch diagonal strips from my extra shirt, then ruffled them. 

 I purposefully placed 2 shorter ruffles underneath the neckline to cover up that pocket.

Then I zig-zagged the ruffles downward, first sewing along the pathway created by the black line.  Then, I added a couple more ruffles on top along the blue line. 


The shirt still needed a finishing touch, so I added 3 fabric flowers with green buttons sewn in the middle along the neckline.

 I really like this shirt.  Its definitely one of my favorite embellished tees. So, Shelley, you are lucky that it doesn't fit me, cause otherwise, I might have been tempted to keep it instead of putting it in the mail yesterday.  As it is, I might just purchase another couple tees in my size, and we just might have to be twinsies!

Tuesday, March 29, 2011

"Home" Resized

Remember this "Home" decoration that I made back in January for my sister's birthday? 
Well, I had such a great time making it, that I decided that I would make HOME or another word of their choice for each of my sisters, sisters-in-law, Mom, mother-in-law and Grandma for birthday gifts.  Of course, I had this brilliant idea a month later and one SIL had already had her big day, and another SIL was having her big day the next week.  So, I've been running a little behind. Oops.   Still, better late than never.   I've already sent off Grandma's set, and she loves them.   For my SIL's set though, I knew she would prefer the letters to be a little larger.    The original letters are only about 6 inches tall at the tallest.   I resized all the letters and ornaments to be approximately 9 inches.  As you can see, those 3 inches have made quite a difference in the scale.

At first I wasn't sure if I liked the new size.  The ornaments just seemed so plain.  But, as soon as I added the tulle, buttons, rattan and other embellishments, I decided that I like this size just as much if not more than the original size.   And on the plus side, this was actually easier to make.  Yes, it took more wood and more paper. But, the cuts weren't as tiny on the saw, so I spent less time cutting and staining the wood.  

Friday, March 25, 2011

Friday Fashions #10, Organdy Ribbon Ruffle Shirt


A while ago, I came across these shirts for a steal at only $1 each.  I immediately planned on doing some sort of ruffled shirt.  Then, a couple of Fridays ago, my sewing machine bit the dust.  It ended up being more expensive to fix the machine than it cost 6 years ago brand new.  So, I ended up getting a new sewing machine.  This shirt is now my first finished project with it.  
 I really liked the bracket with the buttons on the side of the neckline.  So, I wanted to incorporate that detail into the design of the shirt.
 I didn't want to keep the long sleeves however since we are moving into spring/summer.  So, the first thing I did was chop them off. 
 Using the other shirt for fabric, I cut it open at the seams.  Then I cut 3/4in strips on the bias. 
Using a long stitch, I sewed a straight stitch 1/4in from one edge to form a ruffle. 
 I had some 1/2in purple organdy ribbon that matched perfectly that I decided to use to make ruffles too.  This time, I sewed down the middle of the ribbon.  I only barely gathered the ribbon, just enough so that it wasn't flat anymore. 
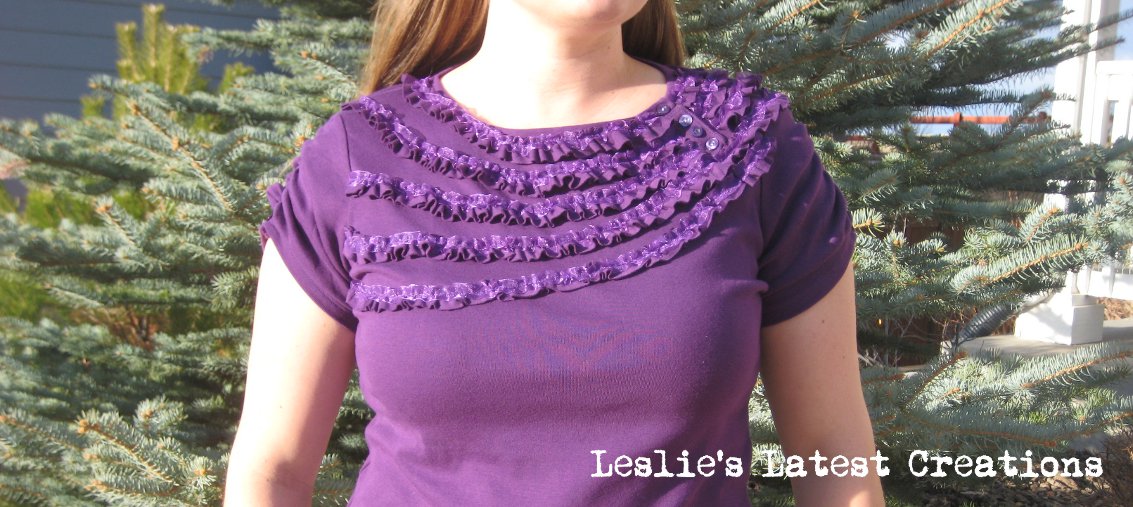
 Next, I layered the knit ruffles with the ribbon ruffle at the top on the shirt.  I was going for a slightly asymmetrical  look along the neckline. 
 Carefully sew the ruffles onto the shirt. 
 I like how the ruffles are aligned at the top edge but that the knit ruffle is longer.
Ruffles are now complete!
 Now, to tackle the sleeves.  I could have just cut them into cap sleeve shapes and hemmed the edges.  But, I loved the way the necklike ruffles turned out and I wanted something equally special and unique with the sleeves.  
 I decided to ruche the sleeves.  Using pins as markers, I created a gather with a long straight stitch.   After I adjusted the gather to a length I liked, I went back and sewed a regular length stitch over the top of the gather to keep it in place. 
 I hemmed the edges.  Then sewed a button onto the bottom of the ruching. 
 I like the whimsy of these sleeves.  

I can't wait to wear this shirt!  


 *I know that I have been making a lot of embellished tees lately.  If you're getting bored with this, don't fear! I'm changing it up next week.  I will be making a skirt with godets, something I have never before tackled.  So, stay tuned.

Saturday, March 19, 2011

Lonestar

I made this for my mom for an early Mother's Day present.  I was just too excited about it to wait and mail it to her in May.  So, it should arrive on her doorstep today.  I can't wait to hear her reaction!  My parents are decorating their house in a rustic urban style in Texas, so I thought these letters would be perfect.  The tallest letters are just under 9in tall so they should fit perfectly on the plate rack on top of the kitchen cabinets in my mom's house.
I thought it would be cute to have the L be in the shape of a boot.  I decoupaged textured basketball scrapbook paper for the leather of the boot.   I cut the spur out of thinner wood and spray painted it with some leftover metallic paint from a different project. 
 I used really muted, neutral colors for the letters.  The O is a sage, the N is a grayish blue.
 The E is a muted mustard color with embossed flowers.  The S is a rusty red.  The T is another grayish color.
 I love the star!  For the A, I wanted to make a Texas Star.  My mom has tried to put them up on her plate rack but with the shape, they keep falling down.  So, I knew I couldn't just buy a star to use as the A.  I cut out a star shape from 1x6 pine wood, just like every other letter.  Then, to achieve the look of the 3D shape for this 2D Texas star, I decoupaged foil pieces onto silver paper.  The R is a brown stripe.  I think these colors should flow seamlessly into my mom's house.
I can't wait to get her reaction to her early Mother's Day gift. 

Friday Fashions #9, Swirly Scarf

I saw a tutorial for this scarf made over at Iron Violet Designs that I thought looked fun, fast and easy.  So, I decided to whip one up for this week.  Its great for Spring since its more for looks than for warmth.
I dug into a bag that I've been meaning to donate to Goodwill and pulled out this tshirt.
It was perfect.  Too worn and small to wear anymore.  I cut it into salad plate sized circles. I got about 12. 

Then I cut each circle into a spiral. Divide into 2 piles. 

Sew the ends together. 

Overlay the piles so that the half the streamers lay to the left and the other half lay to the right.  Then, sew them together. 


Next I cut out a small rectangle from the scraps of fabric. 
 Fold it around the seams and hand sew to hide them. 

Add a fabric brooch and enjoy!

Friday, March 18, 2011

Leprechaun Traps


Last year, to celebrate St. Patty's Day we made a leprechaun trap that we set out on the eve of St. Patrick's day.   We have a naughty little leprechaun that comes out each year that we wanted to catch and steal his gold.  We weren't successful; he avoided the trap.  But, he did leave us some chocolate.


The boys had so much fun that they insisted that we make a trap again this year.  We did.  It is now a fun family tradition.  I let the boys design the trap this year. We decorated a box to be a pirate hideout.  Anakin Skywalker drew a treasure map that we placed inside the box to lure the leprechaun into the trap.  

I love this map.  He is still learning to read.   I thought he did a great job of sounding out words all by himself.
The kids have a great time making these traps with me.   Its a fun easy craft that we can do together.  Have you made any leprechaun traps lately?

LinkWithin

Related Posts Plugin for WordPress, Blogger...